MANUAL
PREFACE
WHAT IS ENRAGE AND WHAT MAKES IT SPECIAL?
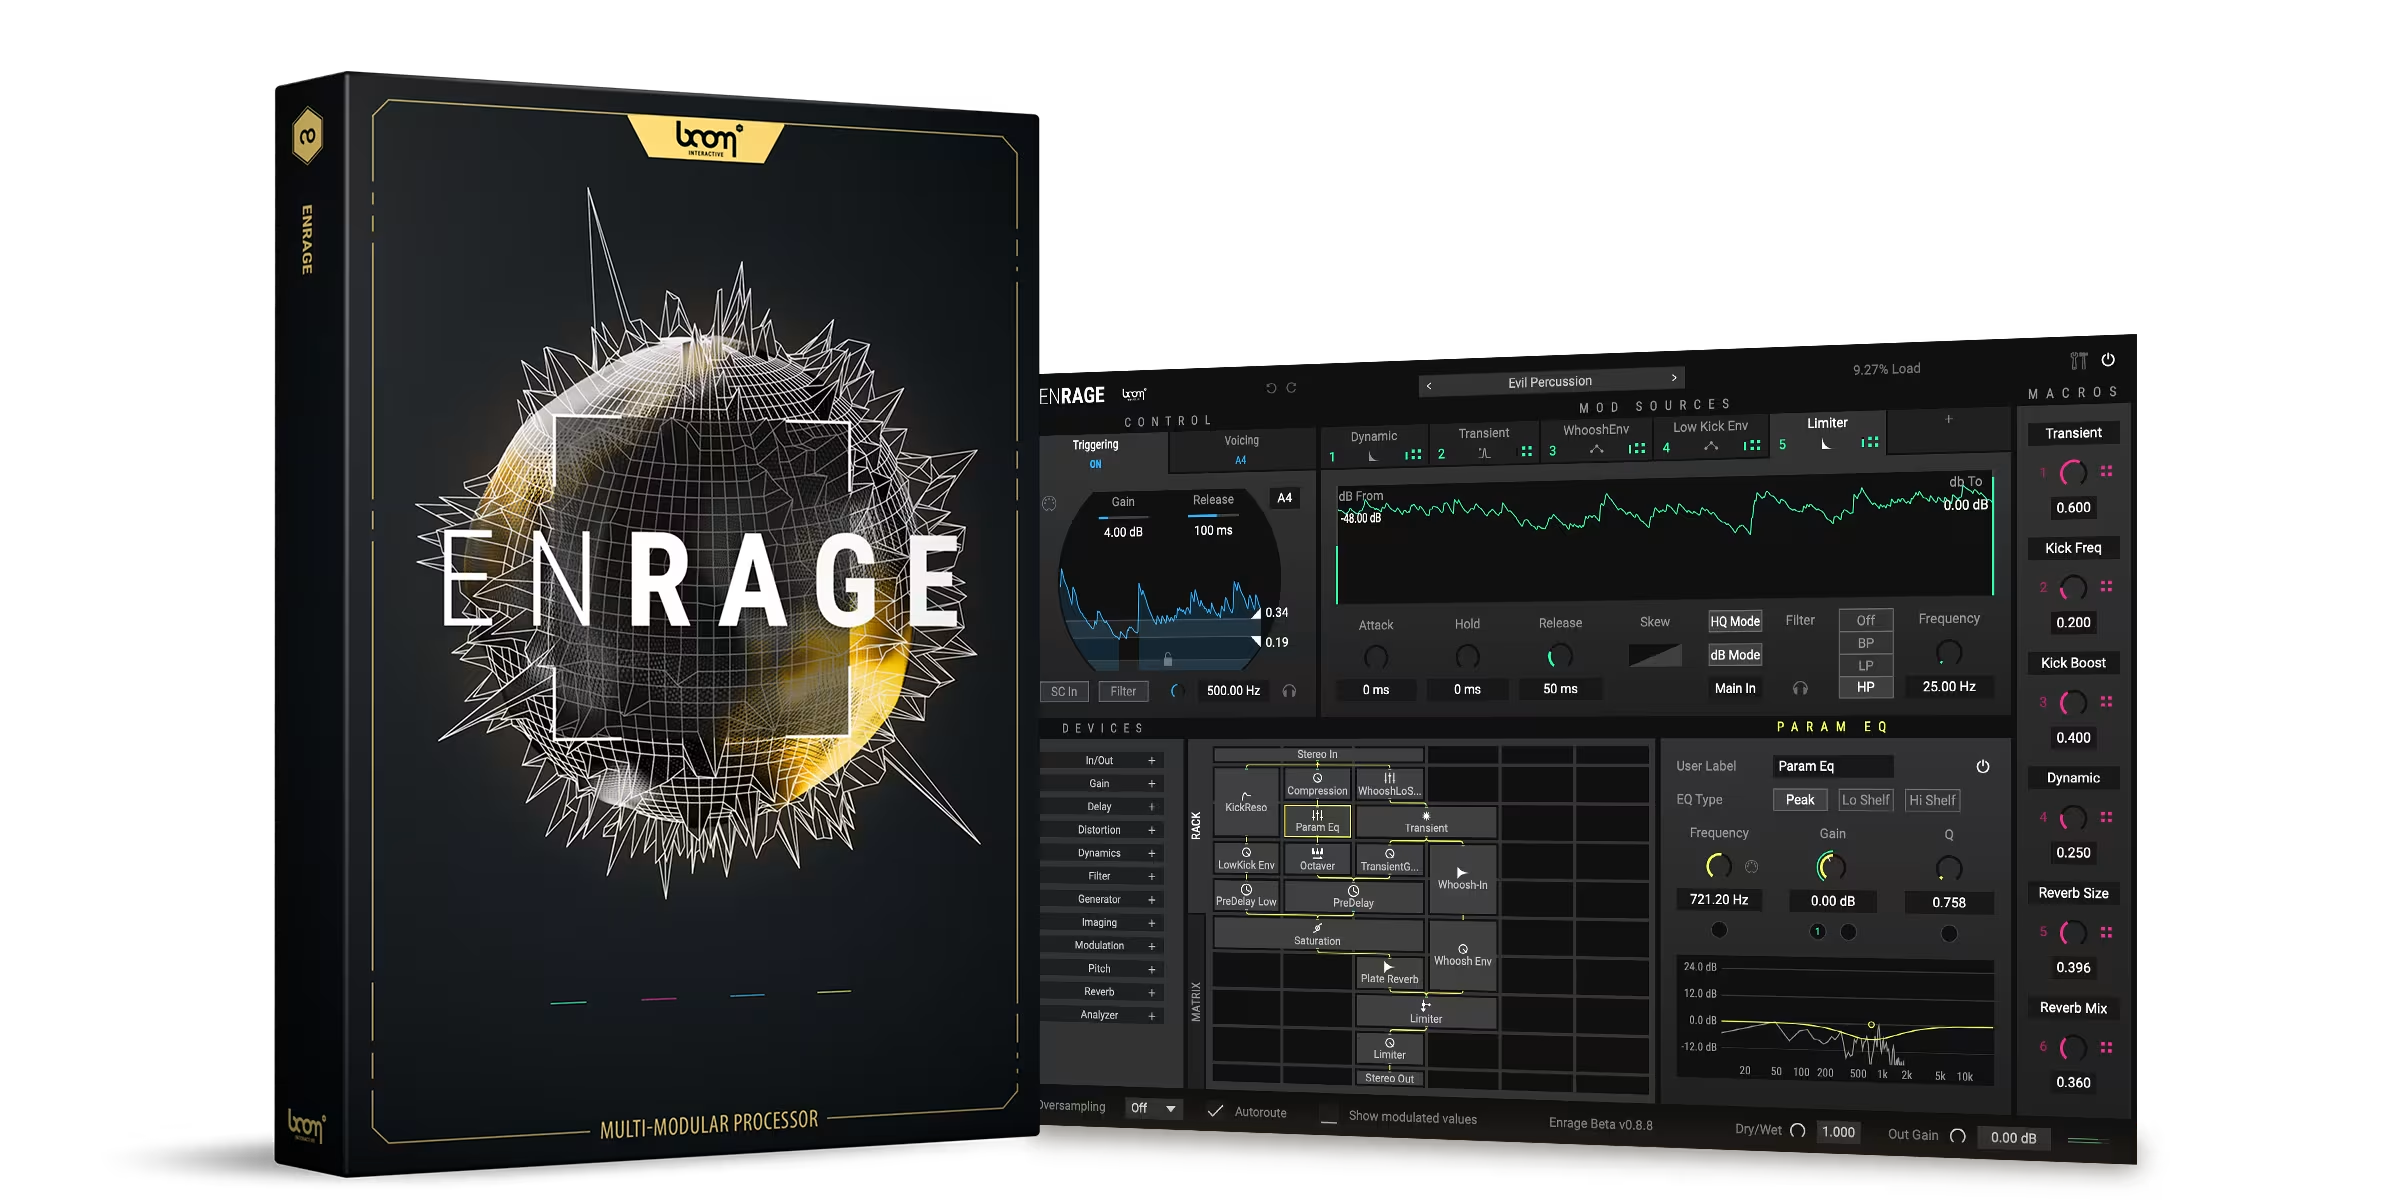
ENRAGE is a modular multi effect plug-in. It allows to freely combine various kinds of audio processors in a 6 by 10 grid. Combined with precise modulators, flexible routing capabilities and high-quality processing devices you can get creative designing highly innovative effects or mastering grade chains.
Minimum System Requirements
WINDOWS: Windows 8 (64-bit), 8 GB RAM, Intel® Core™ i5 (relatively recent)
MAC: macOS 10.13 (64-bit), 8 GB RAM, Apple Silicon or Intel® Core™ i5 (relatively recent)
Installation
After downloading and opening the installer of ENRAGE please follow the on-screen instructions to install the application.
THE MANUAL WILL BE COPIED HERE:
WINDOWS: C:\Program Files\BOOM Interactive\ENRAGE
MAC: /Applications/BOOM Interactive/ENRAGE
USER PRESET BANKS WILL BE LOCATED IN SUBFOLDERS HERE:
WINDOWS: C:\Users\[user name]\AppData\Roaming\BOOM Interactive\Enrage\Presets
MAC: /Users/[user name]/Library/Application Support/BOOM Interactive/Enrage/Presets
Registration
Muse Hub Registration
If you obtained the plug-in from Muse Hub, and experience issues with activation, please use the Contact Support button found on the EnraGE Muse Hub project page, or visit https://support.musehub.com/.
iLok Registration
Upon the first launch of the application, you will be asked to register ENRAGE with your iLok account.
A free iLok account can be created under www.ilok.com
During the first start of ENRAGE after installation, the iLok registration window pops up. ENRAGE is licensed using the PACE Licensing Platform. You need to have an iLok account to use it, however setting up an iLok account is free. You will find all necessary information on how to setup your account on www.ilok.com. You can either directly authorize your computer (machine authorization) or use a 2nd or higher generation iLok hardware dongle. A second or third generation iLok (iLok2 or iLok3) is a product of PACE that can be purchased at www.ilok.com or from any participating music retailer.
Next: please download the iLok License Manager at www.ilok.com.
After your purchase, you automatically receive an order confirmation from us containing the download link for the installer plus a 30 digits long iLok activation code (e.g. 1234-1234-1234-1234-1234-1234-1234-12).
- Open the iLok License Manager application.
- Either select the menu: Licenses -> Redeem Activation Code or click on the small Redeem Activation Code Icon on the upper right of the application.
- You should then copy paste the entire code you received from us into the entry form. Select your iLok as the activation location to immediately activate the license on this iLok and confirm the location.
Watch a step-by-step video tutorial about how to activate your iLok license:
Now you are ready to go!
Quick Start
Once ENRAGE has been instantiated, the most basic setup loads per default. At the top center you will find a grey field labeled “Untitled”. Clicking on it opens the preset browser. Browse through the categories to load presets you desire and try the MACROS or MOD SOURCES to dial it in. Done with the Quick Start – now onto the real fun…
The product doesn't show up in your DAW?
Not activating the software when first launching the DAW can lead to DAWs putting the plug-in into a "failed to scan" blocklist or blacklist.
In such cases it is usually sufficient to:
- check the DAW's blacklist/blocklist
- remove the plugin from that list
- activate it in the iLok License Manager
- cause a plug-in rescan or restart your DAW
GUI Overview
ENRAGE is a highly versatile, professional tool and the GUI might seem intimidating at first glance. However, we tried to keep it as user friendly as possible.
For a better overview of the features and functions, we use the following ENRAGE GUI color code in this manual:
- CONTROL
- MOD SOURCES
- DEVICES
- MACROS
General Overview
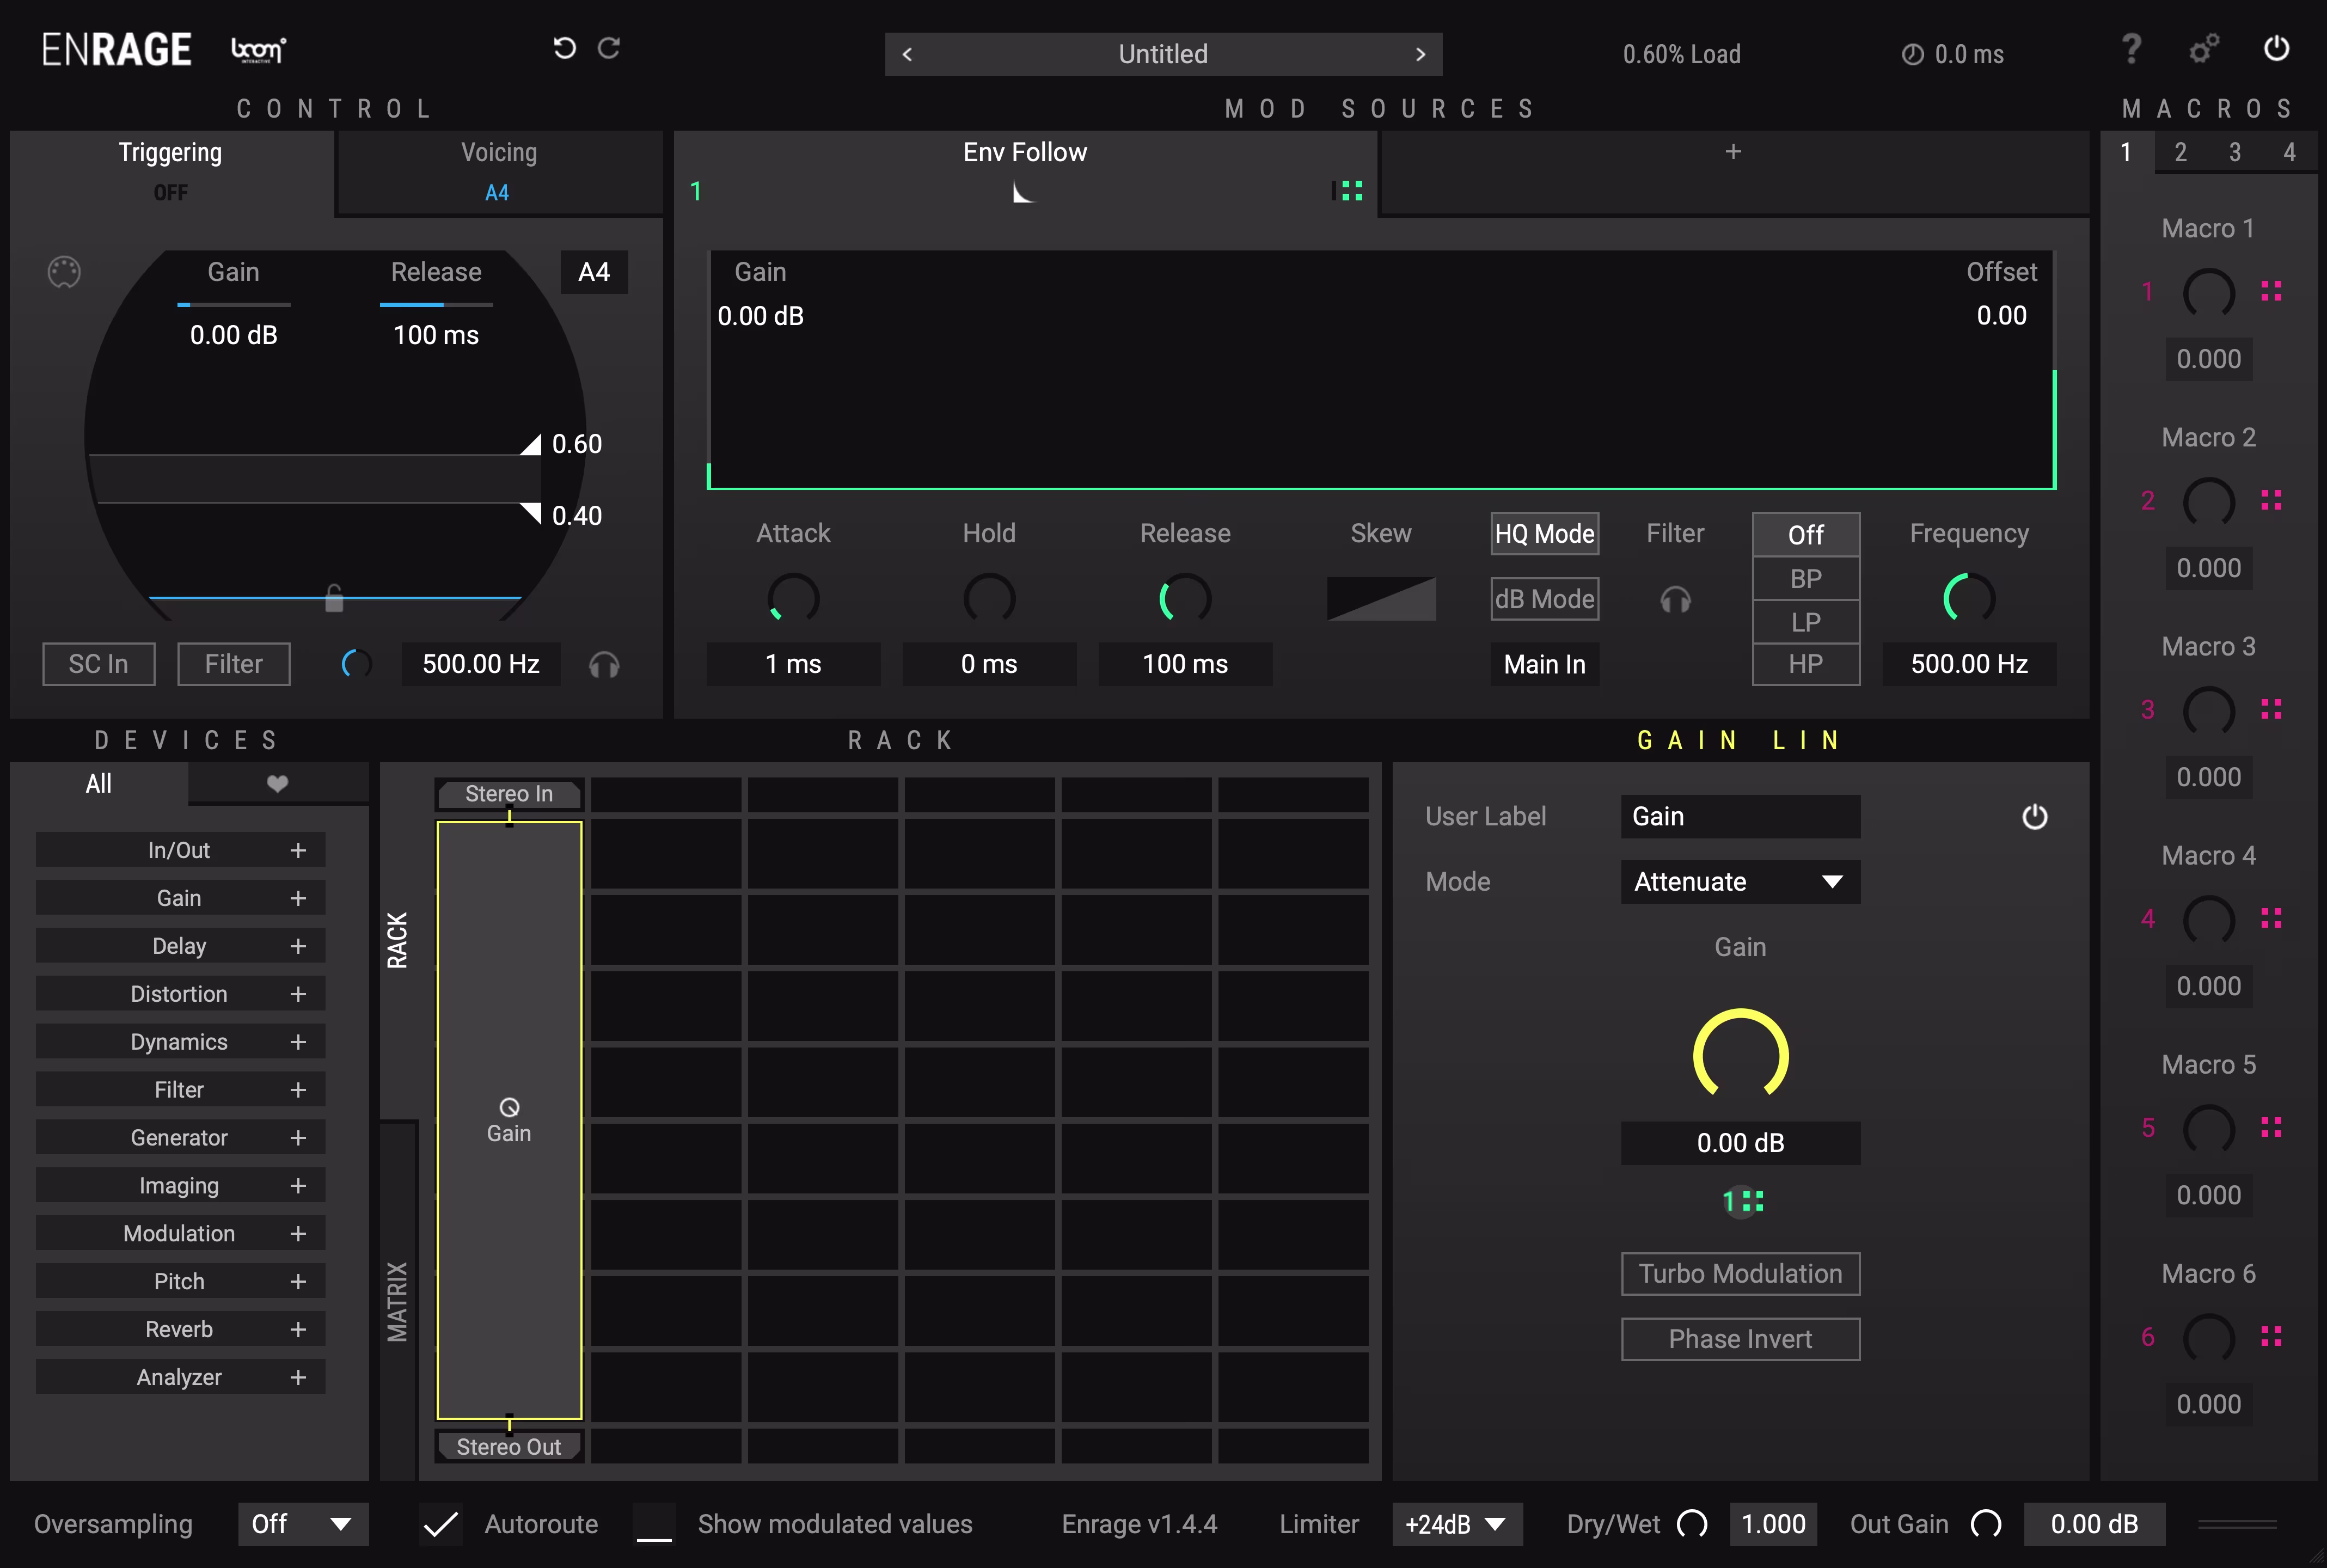
You will find a header and footer as well as four additional, color coded segments: CONTROL, MOD SOURCES, DEVICES (including the Device List, the Rack, the Mod Matrix and the Device Editor) and MACROS.
Header
At the very top, going from left to right you will find some general functions
Title and Logo
Clicking on the Title and Logo shows the version of ENRAGE currently running as well as the Credits and contact information.
Undo and Redo
The little circling arrows are undo- (arrow to the left) and redo steps (arrow to the right) for all changes with the exception of macro automation. The maximum number of available undo steps may vary.
Preset
In the center of the header, you will find the name of the currently loaded preset. Clicking on it will bring you to the Preset Browser (3.7)
CPU Load
To the right of the preset name, you will find a single CPU load meter to check how intense the preset is for your DAW. Note that this is merely an estimate, it does not take all cores into account
Latency
Next to the CPU load meter you will find the latency indicator.
Manual
The question mark button to the right of the CPU load meter will open the Enrage Manual.pdf file directly from the Plugin UI. This of course only works if the manual has been installed correctly during the Enrage installation process.
Settings
The Settings button is located between the Manual and the Bypass button. Clicking on it will bring up two distinct setting windows further explained in chapter 3.3.
Bypass
The icon on the far right within the header is the global bypass button for ENRAGE which bypasses everything except for the global output gain: “Out Gain”.
Settings
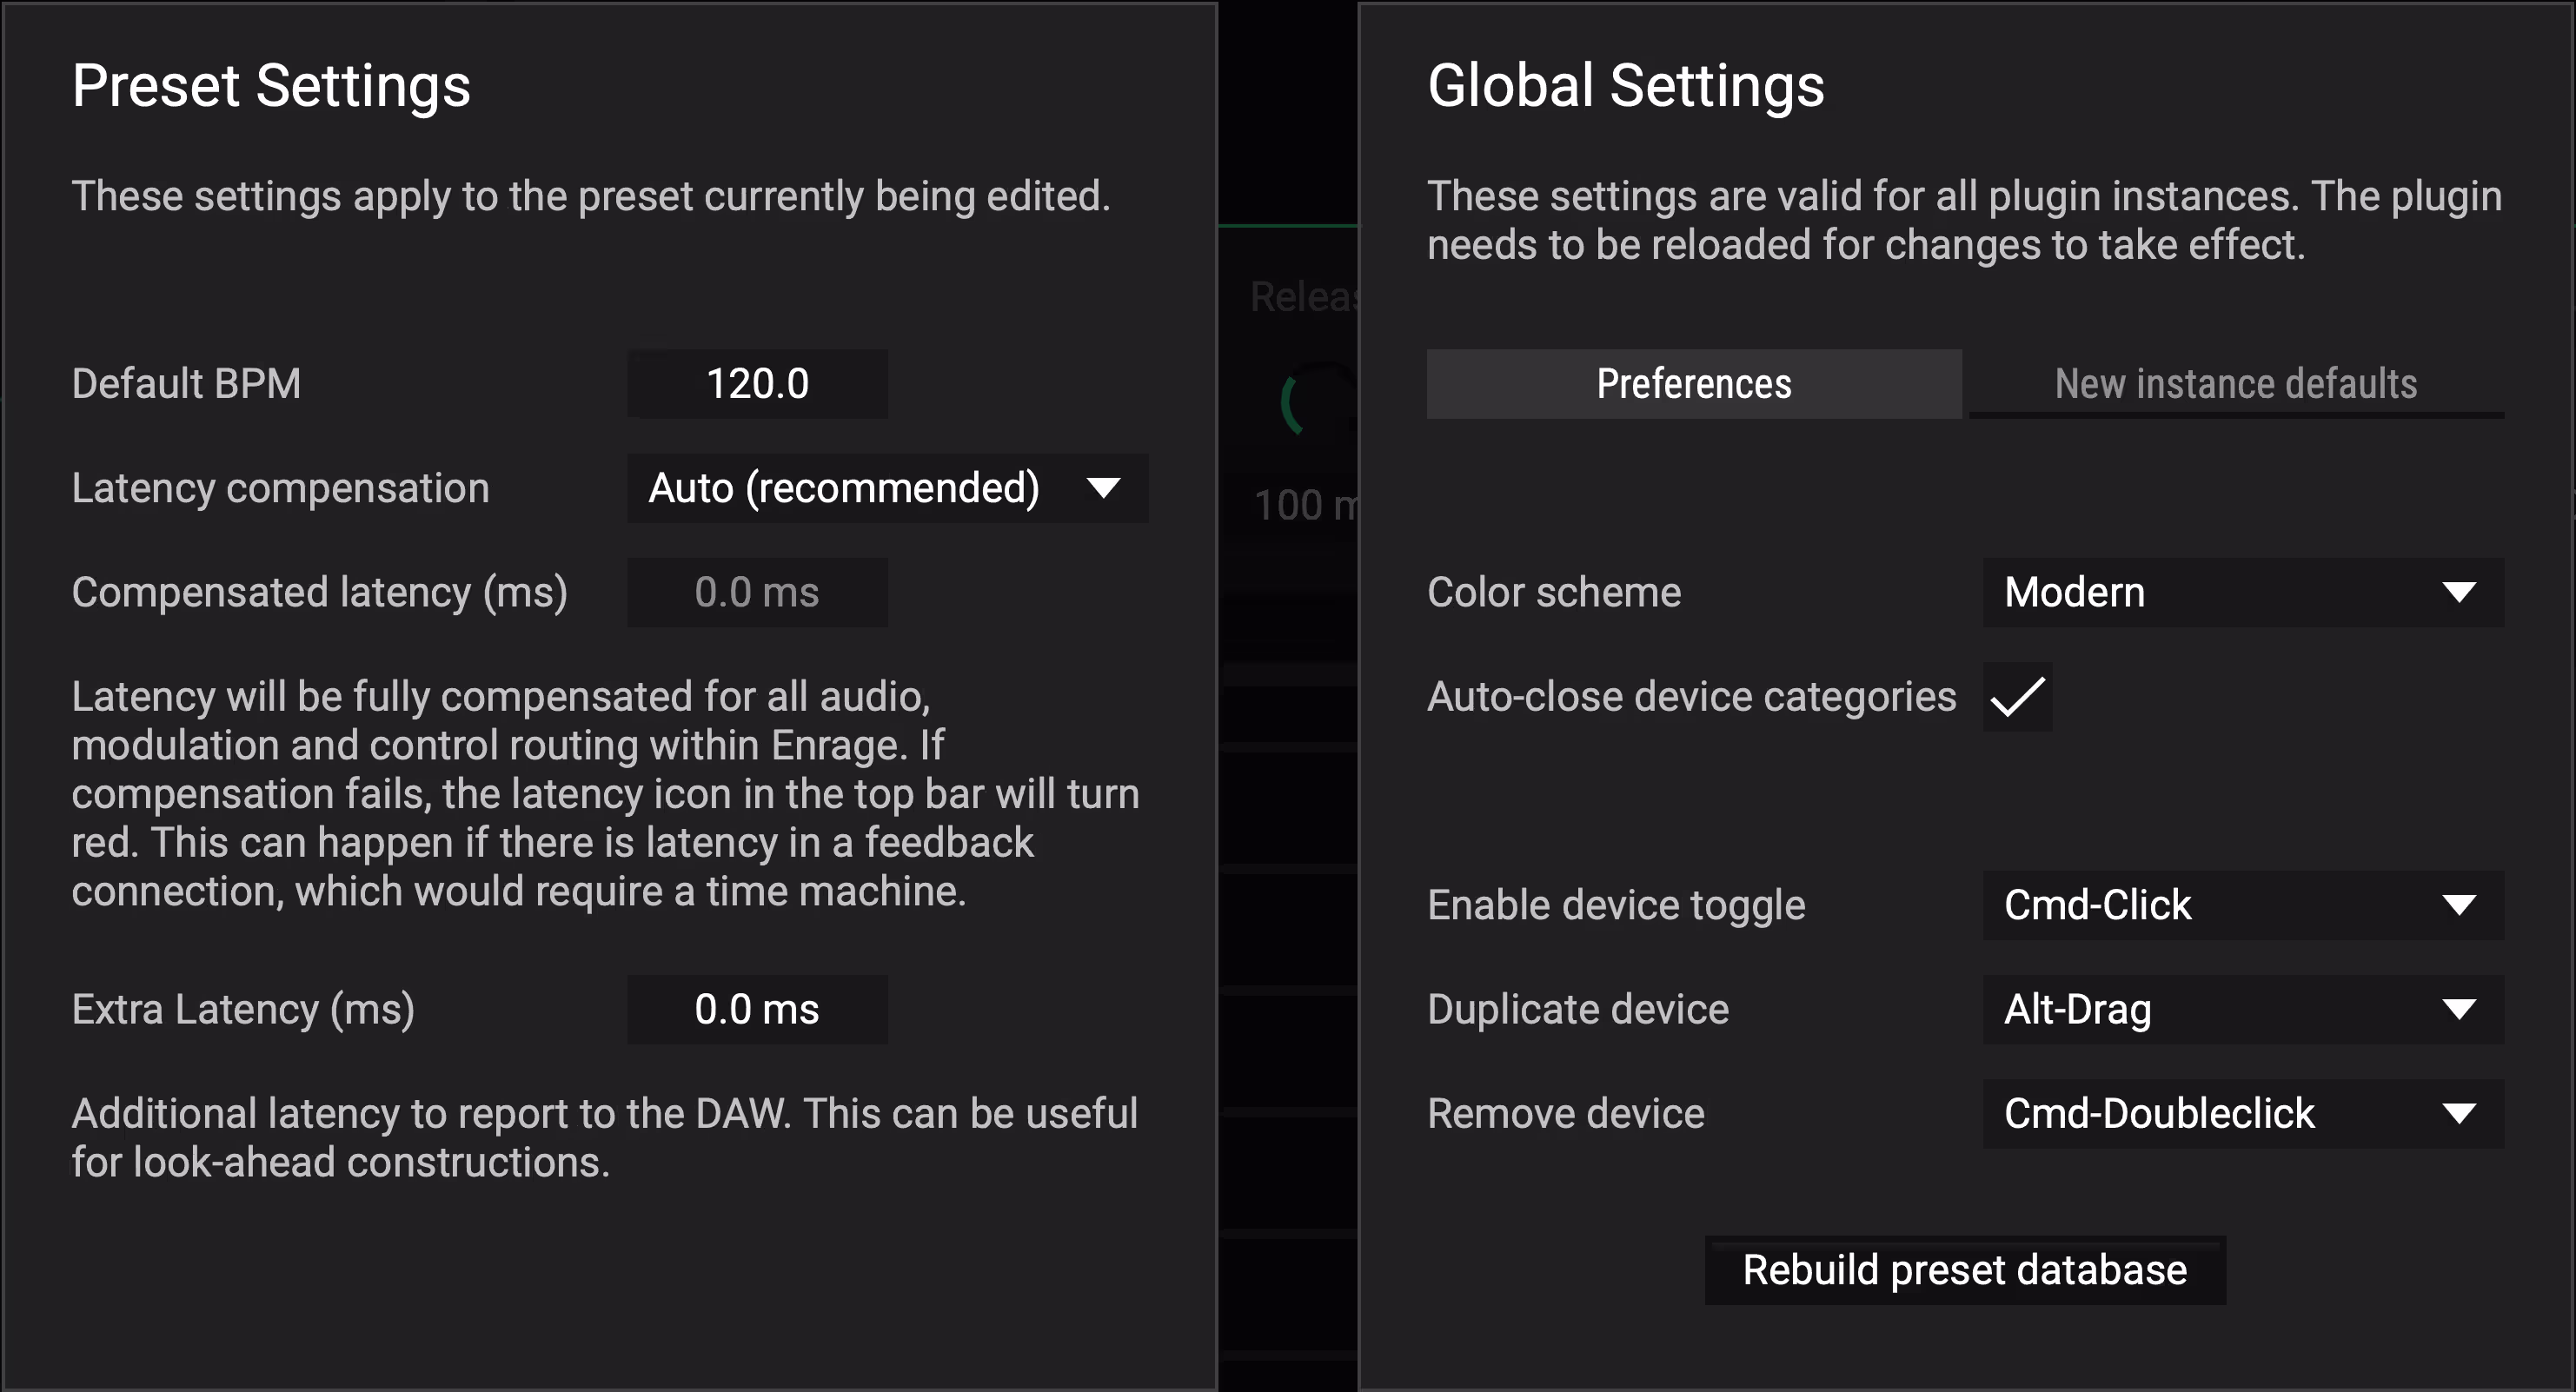
Preset Settings
ENRAGE operates with zero latency, unless specific devices that require a bit of latency to work are in use. These typically are devices that perform some sort of spectral processing, like Pitch Shift, Warp, and Tame. By default, ENRAGE will take care of compensating all latencies that occur within a preset automatically. This includes all audio, modulation and MIDI/Trigger routing. The only scenario in which this does not work arises if there are any cycles (feedback paths) in the presets routing, if these paths contain any devices introducing latency. In such situations, the latency indicator in the header bar will appear red. For such cases it is possible to disable latency compensation and compensate manually as appropriate.
You can add additional latency time manually in the Extra Latency (ms) input field. This value will be reported to the host on top of the actual latency. This is useful if you intentionally delay a signal to construct some sort of lookahead behaviour.
Global Settings
Within the Preferences tab you can make general adjustments that affect all instances of this plugin such as Color scheme (Modern - Classic - Colorblind) and usability optimizations. By clicking on the Rebuild Preset Database button on the bottom, ENRAGE will scan all Preset Directories and update your Preset Browser. You can also change the default modifier keys for the following actions: Enable device toggle, Duplicate device and Remove device.
Head to the New instance defaults tab to set your default settings for the GUI Scale, the Output limiter, the Autoroute behavior of the Device Rack (see chapter 3.6.1) and the display of modulation values via the Show modulated values option.
Control
On the upper left you will find the blue area, CONTROL. It controls any triggered modulation, such as Curve, ADSR or the restart of LFO. You can trigger via audio (active by default) or MIDI (hit the little icon on the upper left within the CONTROL section and potentially set midi voicings in the Voicing tab, also within this section). Voicing is always set to mono until you manually select Poly. In this case ENRAGE will behave like a polyphonic synthesizer and the trigger-envelope or the MIDI signal will not only trigger envelopes but a whole voice. The Poly mode also offers a global Voice-Envelope (AHR) and an optional Auto-Bypass.
The CONTROL section offers several modulation sources as well. You can simply apply any given parameter the same way you would apply a modulation value from the MOD SOURCES section. You will find a detailed explanation on how to do so in the following chapter. Gate will output either 0 or 1 depending on the trigger state. In MIDI mode this will represent the note on/off state. You can also use information deriving from Velocity, Key, Pitch Bend or your Modulation Wheel / Foot Pedal / etc. Once you have applied these modulation values you can still switch back to audio-triggering and make full use of all the options offered within this section.
TIP: Audio Triggering
Audio triggering is configured exactly like it is in Enforcer
Mod Sources
Right next to CONTROL you will find the green section: MOD SOURCES (Modulation Sources). They can be routed to alter parameters inside of ENRAGE. An Envelope follower will be loaded by default. There is a total of twelve different MOD SOURCES which are explained in detail in chapter 5. They all work in the same way concerning how to modulate any DEVICE parameter. Some of them even have the possibility to be modulated themselves. You can drag the Env Follow icon onto an LFO Rate, just to give one example. This will increase the speed based on the input loudness. There are some advanced and special ones, namely Pitch Tracker, Change and Formula.
Setup in the Rack by default:
- Simply hover over the little green, cubic Mod Assignment icon () to highlight every possible target.
- Now drag the icon on the lower right of the Env Follow header onto the black circle () right below the Gain knob:
- Now drag the little green 1 downwards to set the modulation amount. If you do not want the modulation amount to exceed the possible maximum as determined by the knob position, just press and hold shift whilst dragging.
Devices
DEVICES are color coded in yellow. The complete lower half of the GUI is dedicated to this section basically. On the far left you will find the DEVICE Browser. ENRAGE offers a total of 55 different DEVICES. Once you made your choice, just drag it onto the Rack right next to it.
Favorites
You can also save your favorite DEVICES and MOD SOURCES along with their settings by dragging them into the favorite list, which can be toggled by clicking the little heart icon () on top of the device list. These templates can be rearranged freely within the favorite list. To use them, just drag them out into the MOD SOURCES area or the Rack. To delete a favorite simply drag it onto the trash icon () located at the bottom of the list.
The Rack
The Rack will serve as your signal chain building ground. This is where you place DEVICES and organize the routing. You can stretch devices to the left or to the right. DEVICES will connect automatically to DEVICES in adjacent rows, duplicating or summing signals as required. Audio signals flow from top to bottom in the rack. Combining two parallel streams might result in highly overloaded outputs, so be aware of the signal flow.
TIP: Routing
You will always need a Stereo In and Stereo Out in order to actually route audio through the device chain and send it back to your DAW.
The Matrix
In between the DEVICE Browser and the Rack, you can switch to the Modulation Matrix. It shows all assigned modulations. Here you can also add multipliers, change values, remove, or add modulations. To assign modulation values or multipliers you can simply click on the empty button space or directly drag & drop the MOD SOURCE or MACRO of your choice.
You can use the Tap Send and Tap Receive devices to route signals from anywhere in the rack to anywhere else (Chapter 4.1.4). This way, you can create signal chains longer than 10 devices.
Device Editor
Right next to the Rack you will find the parameters and settings of the currently selected DEVICE. There might be drop down menus, knobs, curves, numbers and or buttons, depending on the functionality of the DEVICE itself.
Macros
One of the most important parts are the MACROS, colored red. Whenever you see the little black circles you can connect a MOD SOURCE to, you can also apply a MACRO. They can be automated by your DAW, everything else within ENRAGE cannot be automated. Their purpose is to offer you a fast and simple way to control the overall template setup. You will find 4 pages with 6 knobs each for a total of 24 MACROS.
Preset Browser
On the very top of the GUI you will find a field labelled “Untitled”. If you click on it, the Preset Browser will open. It should rather be self- explanatory. First you will find a search bar right below the PRESET BROWSER title. All presets are then filtered in five different columns: Bank, Type, Category, Subcategory and Preset.
When clicking on a preset of your choice, it will show the Preset Name on the bottom left corner as well as Category and Subcategory classifications. You then have 4 buttons to proceed with. Close will minimize the browser and bring you back to the main GUI. Load will load up the selected preset and by clicking Save As you can store your own presets in the User Bank. The Init button sets the current preset back to default. Above this very button you will find a small heart icon. By clicking on it you will mark the selected preset which will help you to quickly remember your favorite templates. You can then sort the preset list to show favourited presets first by clicking the "heart" toggle at the top right of the name column. At the bottom right of the browser you will find a short Description on how to use certain presets paired with general information and potential use cases.
TIP: Initial Preset
The Init button will load the initial preset labeled “untitled”. You can specify your own init preset that will load in new Enrage instances by right clicking on a preset name and clicking Set as init preset. Revert to the built in init preset in the Global Settings.
TIP: Updating your preset database
If you wish to update your database, head over to the global settings window on the top right corner of ENRAGE right next to the global bypass button.
Footer
The Footer is located at the bottom of the GUI. Here you will find additional Options affecting a variety of sections. This chapter is structured according to the Footer from left to right.
Oversampling
On the very left you can switch on internal Oversampling at a factor of 2x or 4x. Note that Oversampling introduces a tiny amount of latency.
Autoroute
Next you will find an option affecting the Rack. By enabling Autoroute, ENRAGE will try to arrange DEVICES you place or move within the Rack automatically.
Show Modulated Values
When enabled, ENRAGE will display the modulated values in real-time, based on active modulation. When disabled, all value labels will display the knob positions before modulation gets applied instead.
Limiter
To the right of the ENRAGE Version currently running, you will find a global output Limiter that ranges from -24dB to +24dB and will be applied after the global Out Gain. The Limiter will be highlighted every time it gets triggered. This will help you keep an eye on the extent of your output that runs into the Limiter. You can customize the Limiter default in Global Settings (Chapter 3.3.1).
TIP: To protect your ears and speakers
The output limiter can be a handy tool if you experiment with constructions that could temporarily result in high output gain. For example, when setting up and configuring audio feedback paths. To protect your speakers and your ears in such cases, enabling the output limiter temporarily can be helpful.
Dry/Wet
Next you have a global Dry/Wet knob. Be aware that it can be automated within your DAW, but it cannot be modulated within ENRAGE. You can of course achieve something alike by building it yourself in the Rack. If a preset has latency compensation enabled, the dry signal will be synchronized as required.
Resize
UI can be resized by dragging the resizer icon at the bottom-right corner of the GUI. You can also set a default scale factor for new plugin instances in the global settings (Chapter 3.3.1).
Device List
In/Out
Stereo In
Routes the global ENRAGE input into the Rack.
Stereo Out
Routes the Rack audio to the global output of ENRAGE.
Sidechain In
If you have a sidechain setup in your DAW going into ENRAGE, you can route this Sidechain track into the Rack. This might be useful for feeding ENRAGE with different carrier and modulator audio streams in case you want to build a Vocoder for example.
Tap Send
Grabs the audio stream at the inserted position to feed it back to the Mod Sources that process audio input. You can also reinject the signal within the rack at another position. Enrage has four internal buses, called Tap 1 .. 4, which you can select in the device editor.
Tap Receive
Reinsert the signal sent by a Tap Send DEVICE back into the Rack. This allows you to build longer processing chains and construct feedback loops. Be careful when doing that!
Gain
Gain Lin
A simple gain device that lowers or increases gain. You can choose between Attenuate or Boost in the dropdown menu. The Turbo Modulation button removes smoothing. Sometimes the Turbo Modulation is needed but be aware that this might introduce clicks depending on the situation. Finally, you can switch the phase of the input signal inside the device via the Phase Invert button. Modulation will be applied in a linear fashion.
Gain dB
The same as Gain Lin, but modulation will be applied exponentially (Decibels). If you work with the Env Follower in dB mode, Gain dB is the right device to use.
Delay
Tape Delay
A standard delay. Can be switched to Ping Pong mode if needed. Set a Min and Max Delay in milliseconds or note length. Via Delay Mod you can blend from Min to Max Delay. Feedback feeds the delayed audio back into the delay line. Via the Filter dropdown menu, you can choose between different filters for the feedback path of the delay. Via the Edit button you get all the parameters you find in the Filter -> Multifilter device.
Shift Delay
With this device, you can apply a frequency shift in the feedback path of the delay. It comes with a High- and a Low-Cut function that can both be modulated, as well as the Shift value itself. The feedback function works just like the one previously explained.
Multitap Delay
This delay has up to 8 single delays which can each have different Time, Gain, Pan and Feedback settings. Feedback will combine as "cross-feedback" into all taps, which allows for intricate and dense patterns. You can also switch between three different Modes that affect the stereo spread of the delay taps depending on their pan setting in different ways. With Randomize you can randomly create short, medium and long early reflection patterns. Changes will be displayed visually underneath these parameters. At the bottom of this DEVICE, you will find an additional Damping control that will apply a smooth 6dB low pass filter.
Grain Delay
A granular delay which repeats audio snippets of the incoming audio. Change the length of those grains via the Rate parameter. Those grains can be pitched down or up and via Feedback be routed back into the delay. Min and Max Delay can be set in milliseconds or note length and the Delay Mod lets you blend between those two delay times. When modulating the delay time, Grain Delay tends to generate dense, diffuse delay patterns.
Repeater
A powerful looper device which once triggered, samples a specific length set with Min and Max Time. The Trigger parameter is an on / off parameter that can for instance be modulated with an LFO, via the Transient MOD SOURCE or by a Macro. Creates stunning stutter effects. With the Speed knob can also control and modulate the playback speed. By setting the Mode to Frequency instead of Duration you will be able to create tonal effects with this device as well. The Frequency knob can be modulated and set to either hertz or semitones. Try applying a Pitch Tracker as your modulation source.
Fixed Delay
This delay device cannot be modulated (use the Tape Delay for modulation instead) but allows you to set a very precise Delay Time in fractional milliseconds. This is particularly useful if you want to create effects incorporating some sort of lookahead or compensate latency in parallel signal chains.
Distortion
Distortion
A distortion device with four different distortion types: Soft, Medium and Hard clipping plus Fuzzy for some extra grunge. Symmetry majorly alters the distortion, however if Symmetry is used with values other than zero, DC offset might be introduced. Simply activate the DC Filter in these cases to prevent this from happening. This device also features a Pre Gain and Post Gain for dialing in the amount of distortion.
Decimation
Bitcrushing and Samplerate mangling as you know it.
VariDrive
A highly musical and dynamic saturation / distortion device. All parameters do interact with each other and the two Even knobs have the biggest impact on even harmonics, whereas the two Odd knobs have the most impact on odd harmonics.
Waveshaper
Create custom distortion with this waveshaper. Double click into the curve to add main points and drag the hollow points to alter the curve. Double clicking on points deletes them, double clicking on hollow points, however, resets the curve to a linear line. Change the grid from 2x2 to whatever you need. Shift-drag points and hollow points to only move them on the given grid. You can also alt-drag curve shapes (hollow points) to help with creating symmetrical shapes. The segment to the right of the dragged segment will be automatically adjusted accordingly.
Dynamics
Compressor
A versatile Compressor / Limiter that comes with all the settings you expect. Can be used for parallel compression via the Dry/Wet mix as well.
Gate
Simple and functional Gate with similar settings as the Compressor but with an additional Hold parameter instead of Make Up Gain.
ProComp
An advanced compressor that offers a variety of characters and optional Lookahead alongside gain reduction envelope visualization. The Ratio extends below 1:1 (down to 0.5:1) to allow for upward expansion. Tailor the dynamic response using five distinct Modes:
- Balanced
- Snappy
- Aggressive
- Smooth
- Slow
TIP: Multiband Compression
Try combining multiple Compressors with a Band splitter to construct a multiband Compressor. You can even use different lookahead configurations, thanks to Enrage’s fully automatic latency compensation engine.
Limiter
A precision brickwall limiter suitable for building mastering processors. You can optimize the limiting character for any audio material using three selectable Modes: Dynamic, Flat, or Punchy. Adjust lookahead to balance transparency and character.
Filter
Multi Filter
A filter with different selectable types:
- Low Pass (LP12 / LP24): Standard 12dB and 24dB slopes.
- High Pass (HP12 / HP24): Standard 12dB and 24dB slopes.
- Band Pass (BP12 / BP24): Standard 12dB and 24dB slopes.
- Notch (Notch 12 / Notch 24): Attenuates specific frequency bands.
- Allpass (Allpass 12 / Allpass 24): Modifies phase response while maintaining amplitude.
- Vintage Series: LP, HP, and Band Pass (12dB/24dB) which also feature additional saturation controllable via the Drive parameter. In addition to the Cutoff frequency you can also alter the Q value.
TIP: Phaser Effects
Since allpass filters have a flat magnitude response (they don't have any effect on amplitude), try mixing those with the dry/wet control. By combining multiple allpass filters, you can construct your own Phaser style effects.
Param Eq
A one band parametric EQ with Frequency, Gain and Q parameters. They can be altered simultaneously via mouse controls by simply moving around the point located on the curve in the graphic interface of this device. You can also switch between Peak, Lo Shelf and Hi Shelf.
Splash
A special frequency mangling device. Quite similar to the parametric Eq, it simulates the behavior of a water surface to define the magnitude response over the whole frequency spectrum. You can alter the characteristics of the physics simulation with the parameters Tension, Damping and Spread. Changes in Gain or Frequency ripple through the frequency spectrum based on a fluid surface simulation.
Vowel Filter
A filter effect that creates vowel characteristics, blending through vowels. Higher Q settings increase the effect. It has two different modes: Talkbox and Vowelize.
Band Split
A two-row wide device that splits the incoming audio at a set frequency. Allows multiband processing.
3,4,6 Band Split
Same as two band split but occupies more rows to split even more bands. Be aware that all crossover frequencies can be modulated!
Tame
A filter that dynamically detects, adjusts, removes or isolates peaks in the frequency spectrum of your input signal. The main controls Threshold, Reduction and Speed can all be modulated. Adjust the Min Freq, Resolution and Smooth parameters fine tune processing for your input material. By activating Isolate Peaks you will invert the behavior of the Device. Refer to the display section of the Device Editor for a visual representation of what Tame is doing.
TIP: Create a creative morphing tool
Use the Tame SC version of this device for an additional sidechain input. Using it in combination with the Isolate Peaks option turns it into a creative morphing tool.
Generator
Sine
A sine tone generator with adjustable Frequency or MIDI key tracking and Gain.
Saw/Square
Just like the sine tone generator but with Color you can add harmonics, with the Harmonics parameter on the other hand you can morph between even (saw) harmonics and odd (square) harmonics.
Noise
A noise generator. You can switch between White and Pink noise and set the output gain accordingly. Retro is an emulation of a noise generator technique used in popular home computers of the early 80s (Linear Feedback Shift Register). Setting the device to this particular type you will find an additional, modulatable RATE parameter.
Crackle
A special device that introduces randomly distributed single impulses. Set the amount of crackles with the Min Delay and Max Delay parameters. The distribution of cracks can be altered with three parameters: Delay Distribution lets you weight the amount of crackles towards Min Delay or Max Delay, Gain Distribution alters the randomness of the crackle gain and Pan Distribution changes the stereo image behavior.
TIP: Crackle + IR Verb
Put an "IR Verb" device after the crackle device, set it to full wet, and experiment with different samples that you can load as impulse responses.
Imaging
Stereo Split
A single input / two output device wide device that splits the left stereo channel to the left side and the right channel to the right side of the device, so you can then process them separately in two different chains.
Stereo Merge
A two input / single output device. Audio going into the left side is routed to the left stereo track and audio going into the right side of it is routed to the right stereo track.
Panning
This device allows you pan the input to the left or to the right and offers the possibility to narrow the stereo width. Various common pan laws can be selected, with and without gain compensation.
M/S Decode
Decodes an incoming Mid Side (MS) signal into stereo.
M/S Encode
Encodes stereo input into Mid Side (MS) format.
M/S Split
A single input / two output device, that splits a stereo signal into Mid and Side for dedicated MS processing. The first output will contain the Mid signal, the second output carries the Side signal.
M/S Merge
A two input / single output device which expects the Mid content on the left input, Side content on the right input. Converts those to stereo and outputs a single stereo signal.
Modulation
Chorus
The chorus device is a very short, modulatable delay that is ideal for constructing chorus style effects. It offers the possibility to change the Pre Delay time in milliseconds (the higher the value, the lower the frequency) and the Max Depth surrounding the Pre Delay in milliseconds also. Mod uses these parameters to create the typical chorus effect. With Feedback you can strengthen the effect if suiting. Modulating the time with a Triangle LFO creates a variety of familiar sounding chorus effects.
Flanger
A high quality flanger effect with Damp, Frequency and Feedback. To create a basic flanger, modulate the Frequency parameter with a Triangle LFO, potentially in DAW sync.
Phaser
A classical phaser effect with up to six selectable stages (you won’t find this very often). Features a Cutoff frequency and Feedback parameter. Modulated by an LFO, it creates the typical setup you know from various phaser plug-ins.
Vocoder
Create your own vocoder with tons of options in the Rack. Being a two-input device, the Carrier input is on the left and the Modulator input on the right channel. You can switch between two different Modes. It will by default be set to Adaptive. Resolution configures how precisely the vocoder will transfer spectrum of the modulator to the carrier. Low values will smooth the frequency spectrum strongly, in which case small details in the timbre of the modulator will have less effect on the carrier. Shift will affect the formants of the modulator. If your modulator or carrier are quiet, you can make up the result with Boost. To further improve the responsiveness of this DEVICE, you can control the Attack and Release in percentage. All parameters mentioned can be modulated. Changing the Mode to Direct will deactivate Resolution, Attack and Release to present a simplified and more direct approach.
TIP: Basic Vocoder Setup
Basic setup would be inputting a vocal sample on the right channel as the Modulator (Stereo-In). Setting the CONTROL to MIDI, Voicing to Poly, inserting a Saw / Square Generator device as a Carrier on the left channel with MIDI controlled Frequency and most likely an ADSR (Saw / Square) with some Color mixed in and you are set with the most basic vocoder you can think of. Much for fun though obviously when you experiment with it and for instance use the Sidechain In device as Carrier while putting ENRAGE on a vocal track. Try a Noise generator as carrier, set mode to Adaptive and use a high Release setting. This will result in almost "reverb" like output
Ring Mod
A Ring Modulator multiplies two audio signals in the time domain where the left input gets multiplied by the right input. Either input can be the Stereo In or a Generator device or go ahead and experiment with a Sidechain In device and feed other audio material from your session into it. A common effect is applying ring modulation with a sine oscillator.
Timbre
Allows formant shifting, brightness adjustment and other timbral transformations of your sound. The Warp and the Resolution knob can both be modulated and offer intuitive access to this device. You can also choose between four distinct Modes to further alter the behavior. Works on polyphonic material as well.
Pitch
Pitch Shift
A general-purpose pitch shifter device which offers the opportunity to shift in semitones. The overall behavior can be altered firstly by the Algorithm. Here you can choose between Granular and Spectral. In some cases Spectral will perform better, yet it will smear transients whereas Granular does try to preserve them which in some cases may result in "machine gun" like repetition effects. Just try them both and see what suits your audio source. Now you can further adjust the behavior by setting the Response type. Whilst working with percussive audio or the like it is recommended to select Snappy, whereas Smooth would be the choice for tonal audio material.
Freq Shift
A frequency shifter that moves all frequencies in a signal up or down by an equal amount. Unlike a pitch shifter, a frequency shifter ignores the harmonic structure of the input. A perfect pitch shifter for monophonic, single tone audio input with only one dominant fundamental such as kickdrums for instance. Gets creative when used on harmonically rich material or audio that mainly contains noise. Leaves all transients perfectly in shape and is highly artifact free. Because of these attributes it should be first choice when retuning drums is what you aim for.
Voice Shift
A pitch shifter dedicated to monophonic, tonal audio and more specifically: vocals. This pitch shifter also provides control over the formants which can and should be used creatively as well.
Warp
A frequency mapping device. Map the incoming frequency to a different frequency. Via Amount you can blend from a straight and normal mapping towards the curve you selected.
Sub Octaver
A special bass enhancer that in phase adds one octave and / or two octaves below the input signal. Works best on low, tonal input.
Reverb
Basic Reverb
Basic and CPU friendly room simulation with the possibility to modulate Width, Size and Damp. Set the Room Scale and Modulation to taste.
IR Verb
A Convolution Reverb that precisely simulates the reverberation of a physical or virtual space. Import pre-recorded impulse responses of real locations by right-clicking on the small screen and hovering your cursor on Built in IRs. You can simply drag audio files from a file browser into the sample window as well. It will also visually display the audio sample. By left clicking on the display window, you can adjust the sample start. This is specifically important whilst working with reversed IR’s.
CosmoVerb
An expanded reverb unit covering the range from ultra-compact to wide based on feedback delay networks. The diffusion and late reflection stages can be toggled individually. Basic duration and character are easily tweakable with just the Size, Diffusion and Feedback controls. Add movement with Modulation and sculpt the tone using the Filter Section which provides individual control over Low and High frequency rolloff.
TIP: Experiment with the IR Verb
You can get very creative with this device and import all sorts of audio samples to design unique texture for your reverb In such cases, it may be desirable to disable Normalization via the Normalize toggle button. The Reverse button will reverse the reverberation tail. Right underneath these buttons you will find the Pre Delay section, where you can set your Pre Delay either in milliseconds or in notes..
Analyzer
Analyzer
A visual analyzer with three different display types and an RMS / Peak metering section.
Spectrum
This setting will help you to gain insight of the overall frequency spectrum with frequency on the horizontal axis and gain in -dB on the vertical axis.
Scope
Here you find an Oscilloscope that lets you observe the waveform of incoming audio signals. Comes with left and right channel separation and a Gain, as well as a ZOOM knob to optimize the visualization according to your audio material.
XY
In this setting you can precisely monitor the panorama of your input signal through a Vectorscope. This presentation layer will help you to keep an eye on stereo width and mono compatibility of your incoming audio signal.
Mod Sources
Everything that relates to MOD SOURCES is color coded green. Thus, whenever you apply one to a DEVICE or to another Mod Source you will see a little green number which represents which Mod Source modifies the given parameter.
Env Follow
The Envelope Follower does what you would expect with numerous different ways to tweak it. Being one of the core MOD SOURCES, you can change it to whatever you need.
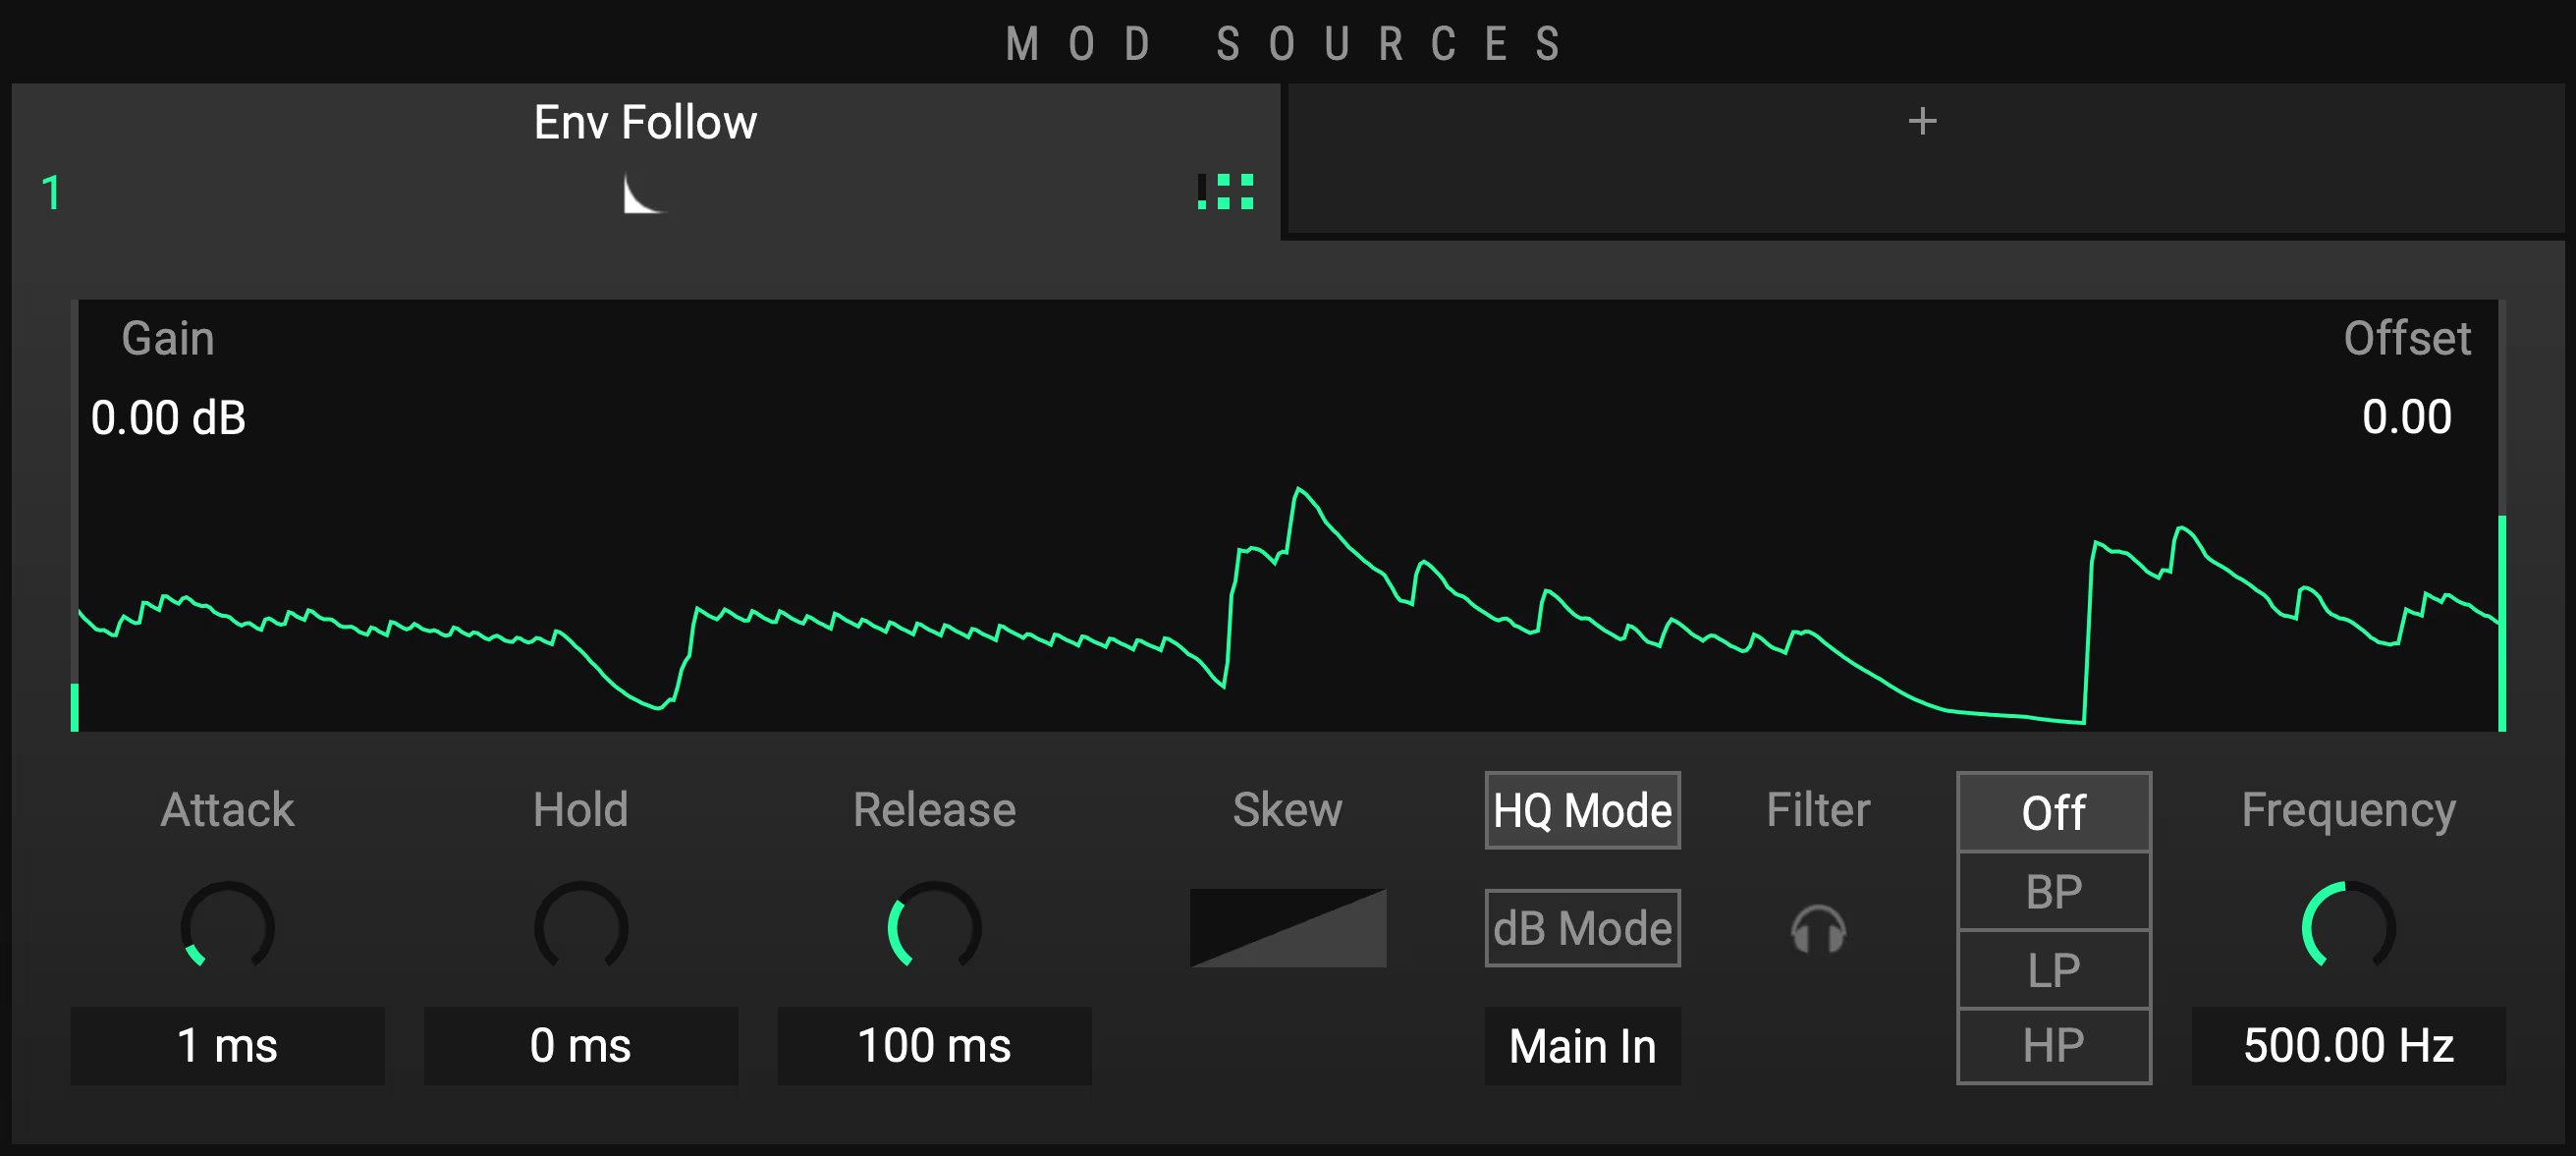
Display
The Envelope Follower Display visualizes the input signal altered by the settings. On the bottom you have zero modulation, on the top maximum modulation.
Gain
With Gain you can visually raise or lower the input gain for example if the input is simply not loud enough and you want to modulate higher values, or if the input gets quieter because the Envelope Follower Filter is in use.
Offset
Offset lets you alter the analysis even more by shifting the starting point upwards or downwards. Shifting it upwards means the minimum modulation is not zero anymore. Shifting it downwards means that quieter input signals will not be analyzed at all.
dB Mode: dB From
In dB Mode you have two different settings. dB From is the lowest analyzed negative dB value. Likewise, dB To on the right side of the visualizer is the ceiling at 0 dB.
dB Mode: dB To
You can limit the analyses on higher gains, similar to visually clipping the input signal.
Attack, Hold and Release
Attack, Hold and Release are set to moderate values by default which should give usable results most of the time. However, if you need to grab fast moving gain changes or want slower and smoother modulation you can alter this behavior.
Skew
Skew basically bends the output curve of the input analysis towards quieter or more energetic signals. Click and hold in the middle of the little graph and drag it up or down to change the curve. Right click on it for a drop-down selection with different Skew curves.
HQ Mode
High quality mode will lead to less "ripple" with short attack and release times. It is slightly more CPU heavy and rather dedicated to compressor / limiter creation. To wrap it up, it’s always a good idea to switch it on when working with rather fast attack and release times.
dB Mode
In dB Mode the Envelope Follower analyzes the signal in decibel, thus exponentially, rather than linear. Be aware that the options for the visualizer change from Gain and Offset to dB From and dB To (see above).
Input Selector
By default set to Main In, which analyzes the incoming audio stream. Click on it to change the Envelope Follower input to sidechain or a tap source input from within the Rack.
Filter Section
To be able to focus the analyzer on specific frequency ranges, there is a built-in filter section prior to the analysis. You can select filter types (BP = Bandpass, LP = Lowpass, HP = Highpass) and select the frequency you wish to use. The little headphone icon lets you audition this filter with a bypassed devices Rack to dial it in very precisely.
LFO
The LFO is straight forward, yet it comes with some interesting options.
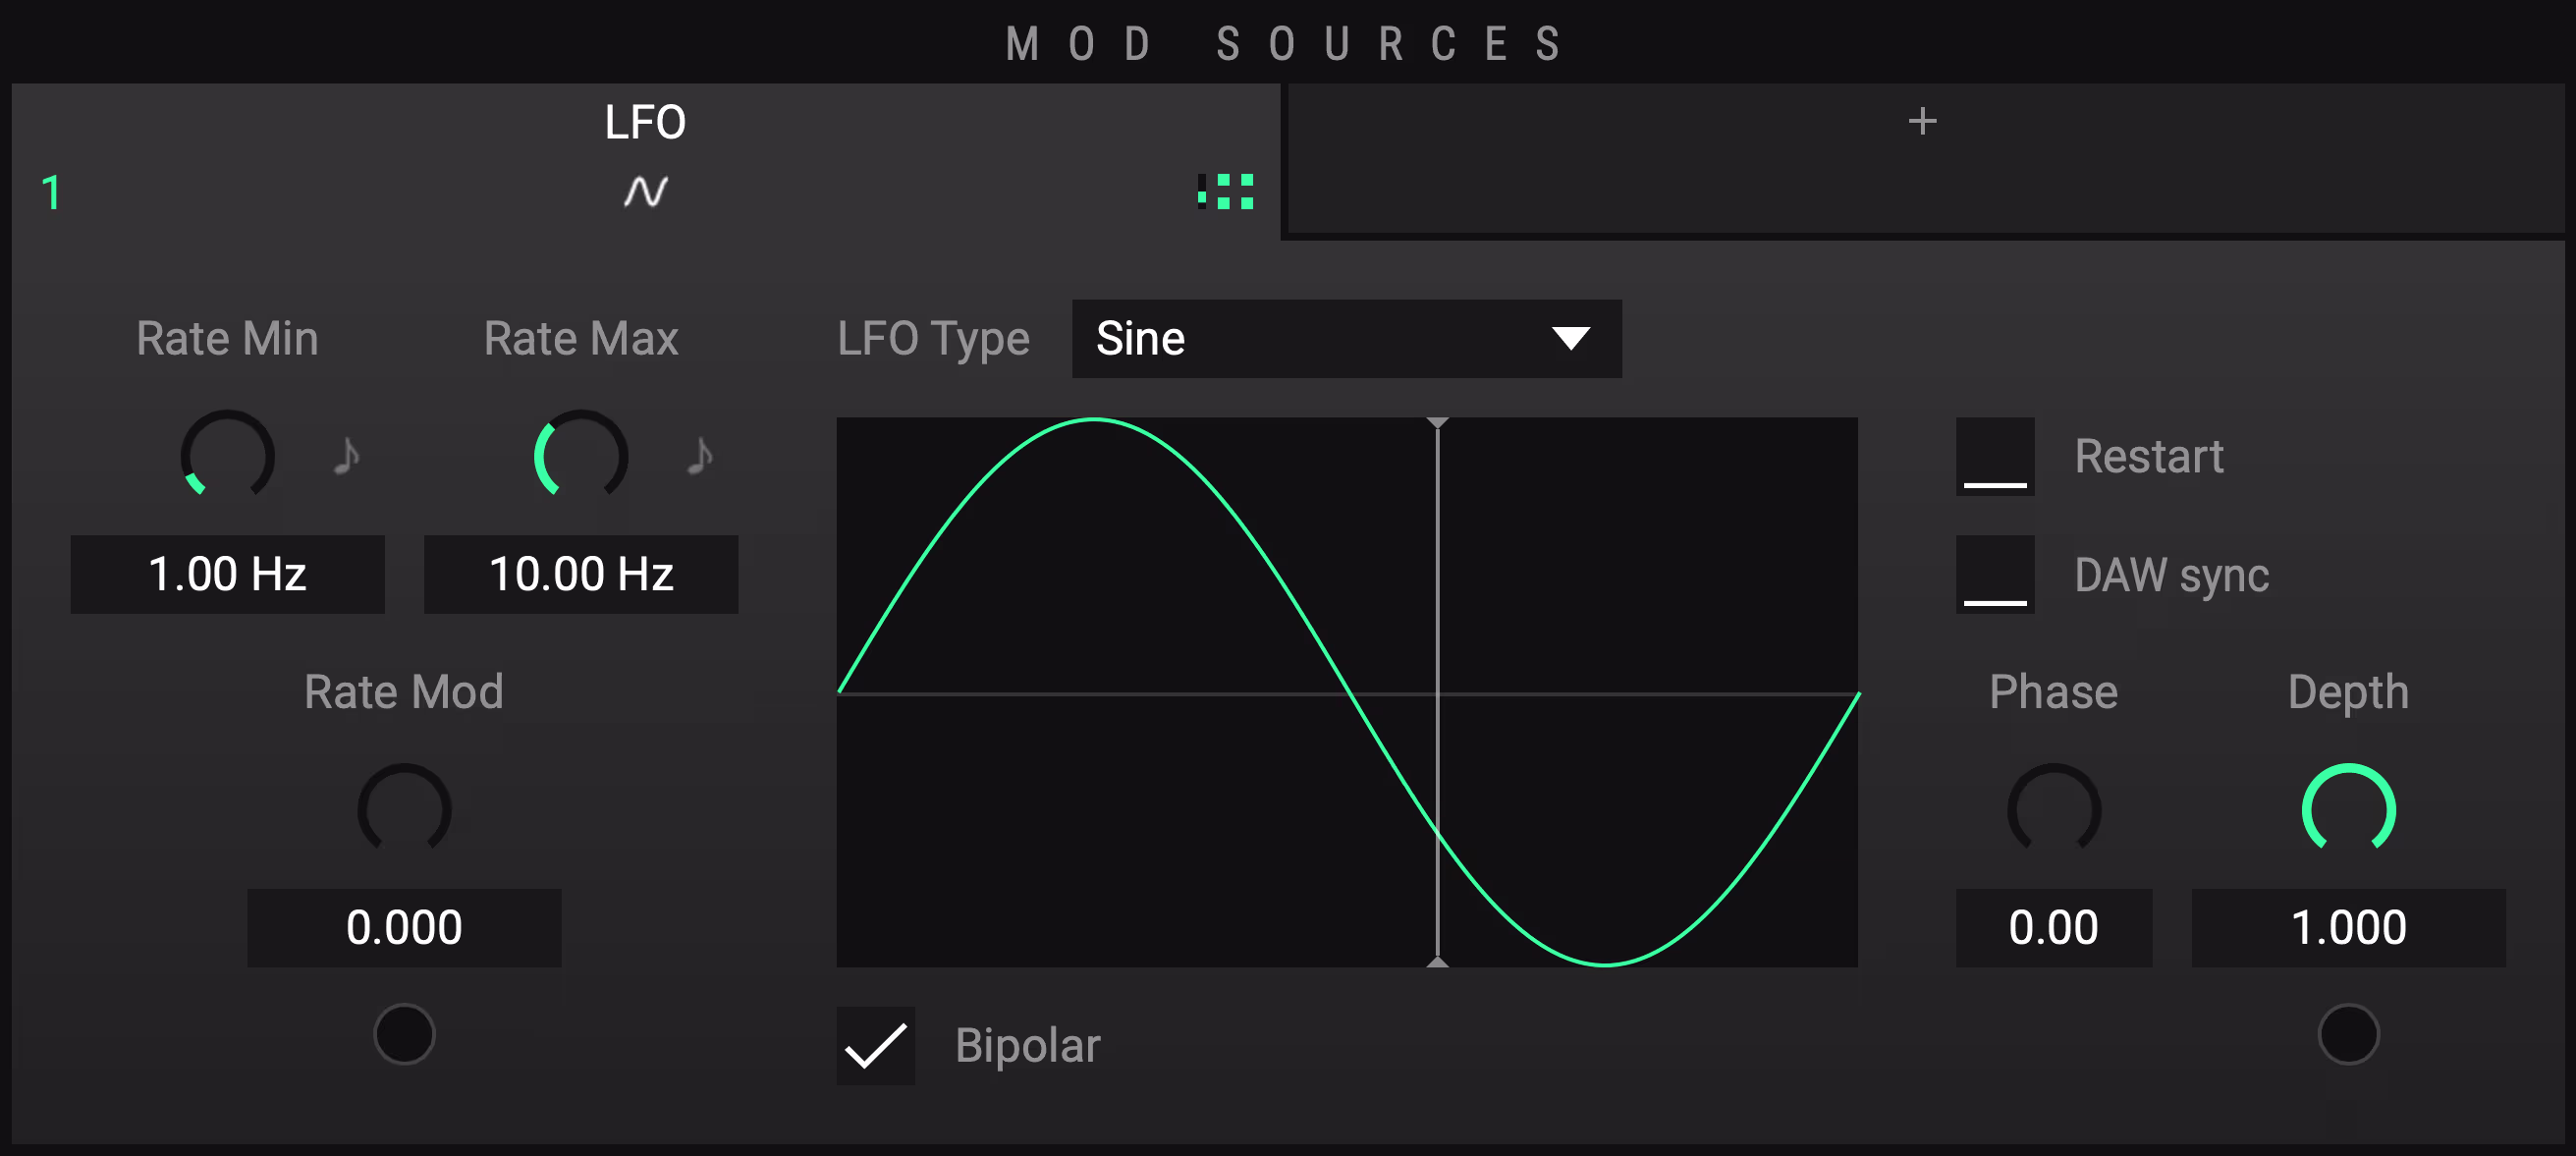
Rate Min, Rate Max and Rate Mod
Starting with Rate Mod, this parameter blends between Rate Min and Rate Max. Set all the way down to 0.000 means that the LFO speed is the same as Rate Min. Turned all the way up to 1.000 on the contrary, the LFO speed is the same as Rate Max. So set the rates according to your needs. The little note icon lets you put the rate into note length grid. Rate Mod again can be modulated by other MOD SOURCES (like Envelope Follower or another LFO) or via the MACROS.
LFO Type
Select between basic curves like Sine, Triangle, Saw and Square, set it to Random Sample & Hold, which creates a random value that holds for the length of the LFO rate, or Random S&H ramped, which smoothly moves from one random value to another over the length of the LFO Rate or even use Custom to draw your own LFO shapes.
Restart
Restart can be used when you want to trigger restarts of the LFO via the CONTROL section. That can be either via audio or midi, see CONTROL section.
DAW sync
Syncs the note length to the DAW bpm. Note: when DAW sync is active you cannot modulate between Rate Min and Rate Max anymore because that behavior is taken over by the tempo of your DAW. You can then do tempo changes in your DAW instead of course.
Bipolar
Turned on by default, bipolar makes the LFO go up and downwards. Deselect it to get a range from 0.000 from the bottom to 1.000 at the top of the LFO curve.
Gain
Gain lets you adjust the amount of the signal that will be affected and works like a dry/wet knob in this regard.
Phase
Phase lets you add an offset to the LFO position.
Depth
With Depth you can take control over the intensity of this MOD SOURCE. It is important to note that you can modulate this parameter as well.
TIP: Create pumping ducking effects
Set rate to 1/4, draw a custom shape, set to unipolar, modulate gain -> easily create pumping ducking effects.
CURVE
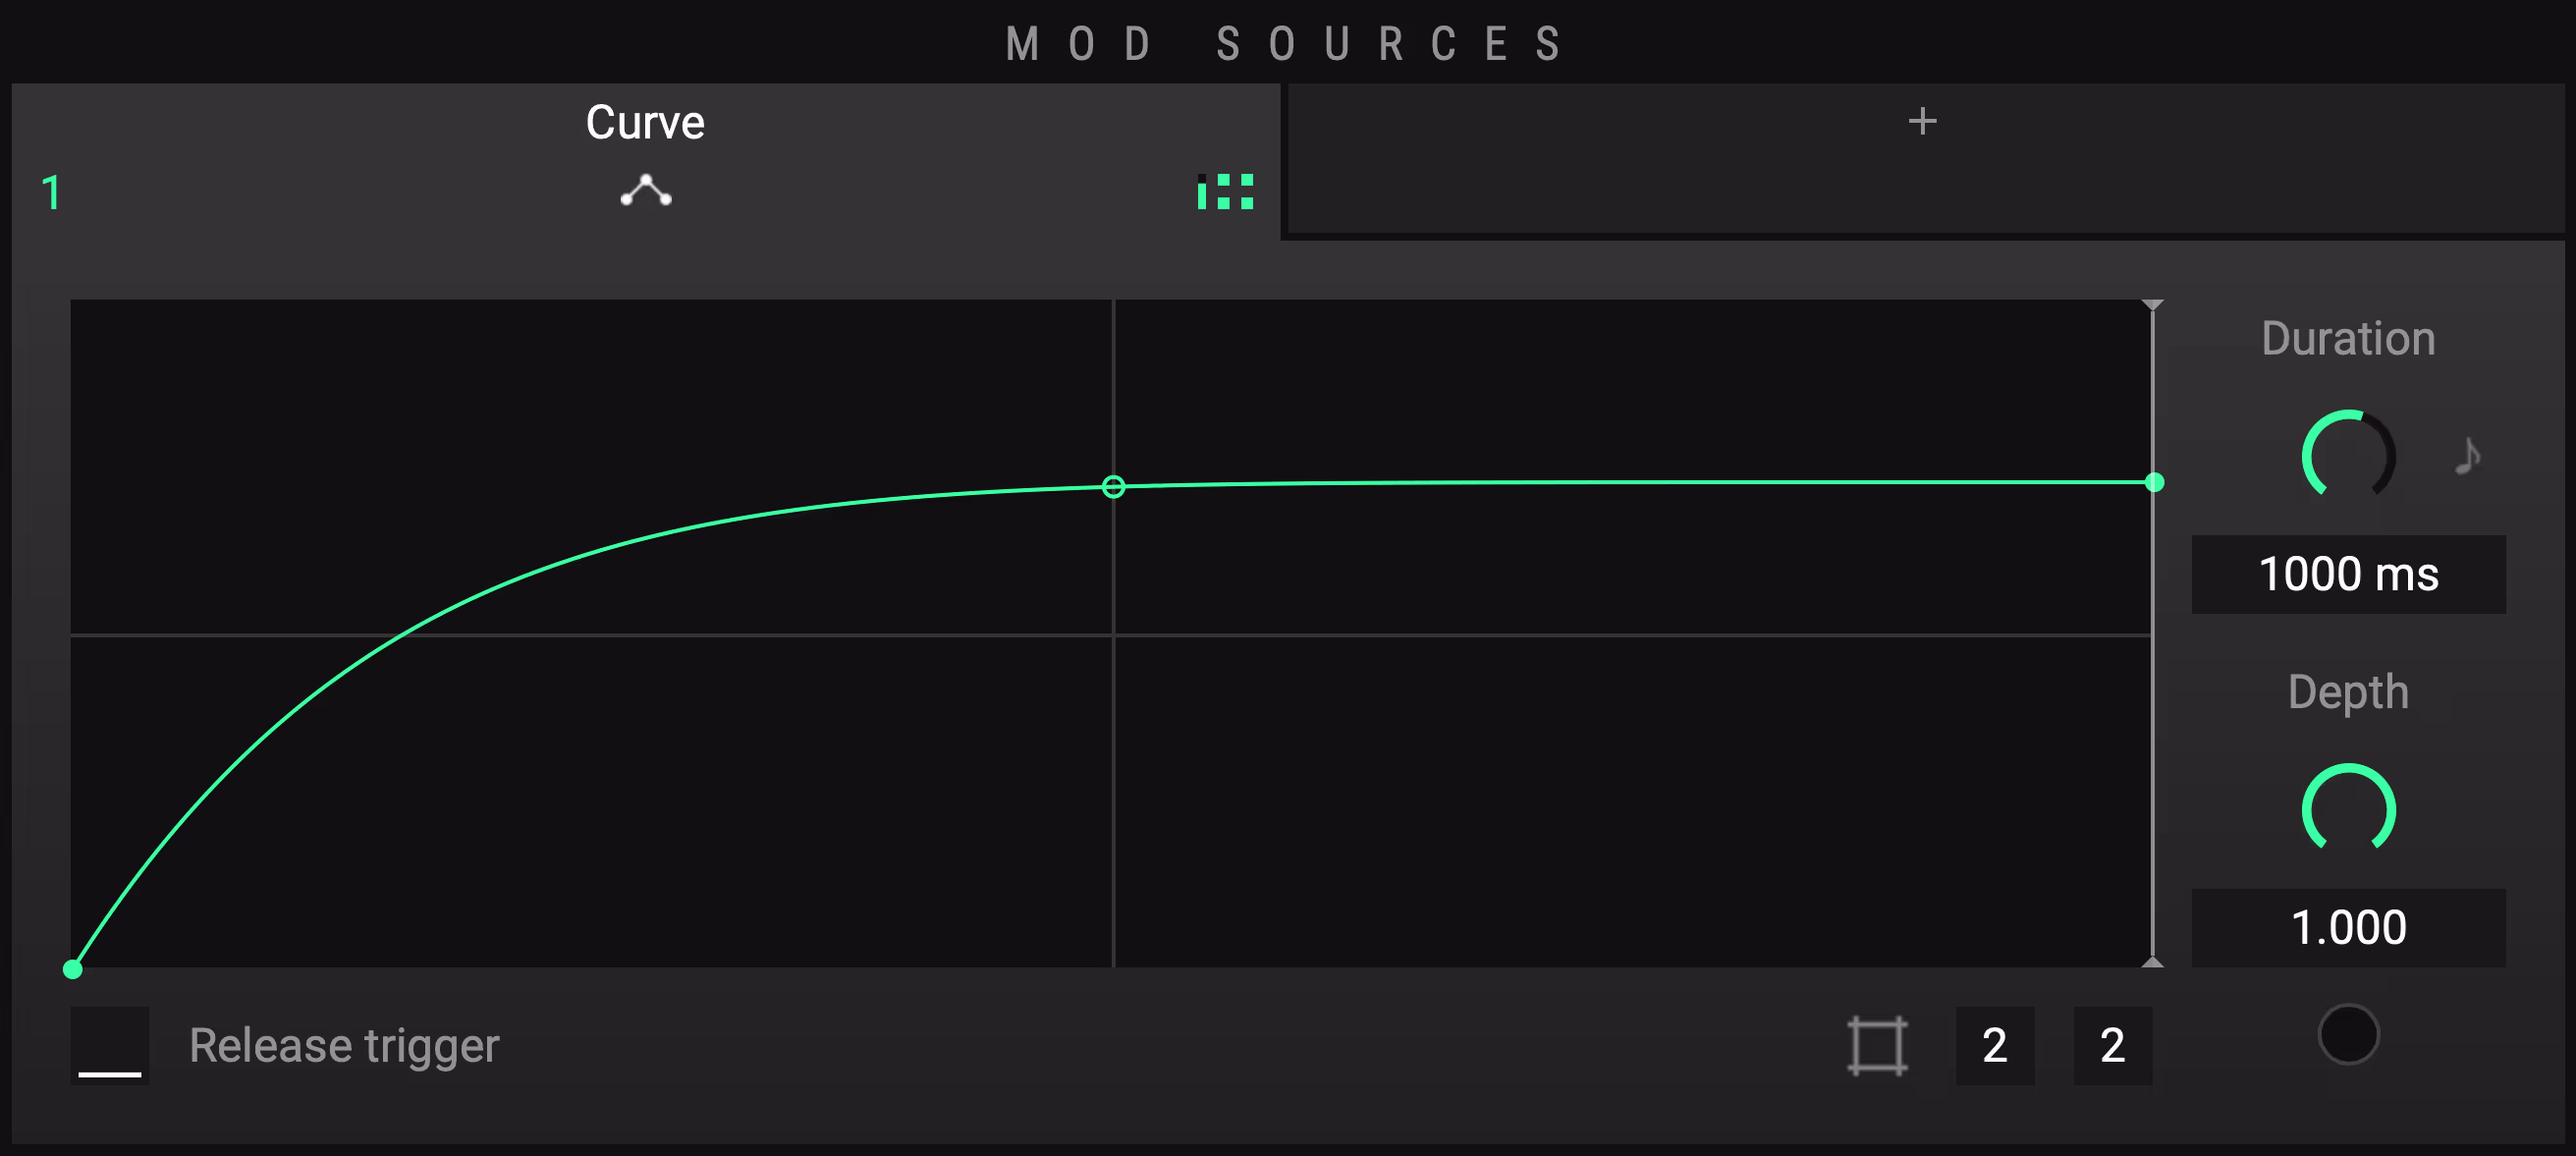
Curve is a simple yet powerful MOD SOURCE which lets you draw custom curves which get triggered via CONTROL either by audio or midi. Double click in the Curve window to create a new anchor point. Double click on that point again to remove it. You can alter the grid and via shift-click and drag you are able to move points only on the selected grid. Set the length, the curve should take from start to end. The Duration can be measured in milliseconds or note length. Gain lets you adjust the amount of the signal that will be affected. Depth will allow you to play around with the intensity of Curve.
ADSR
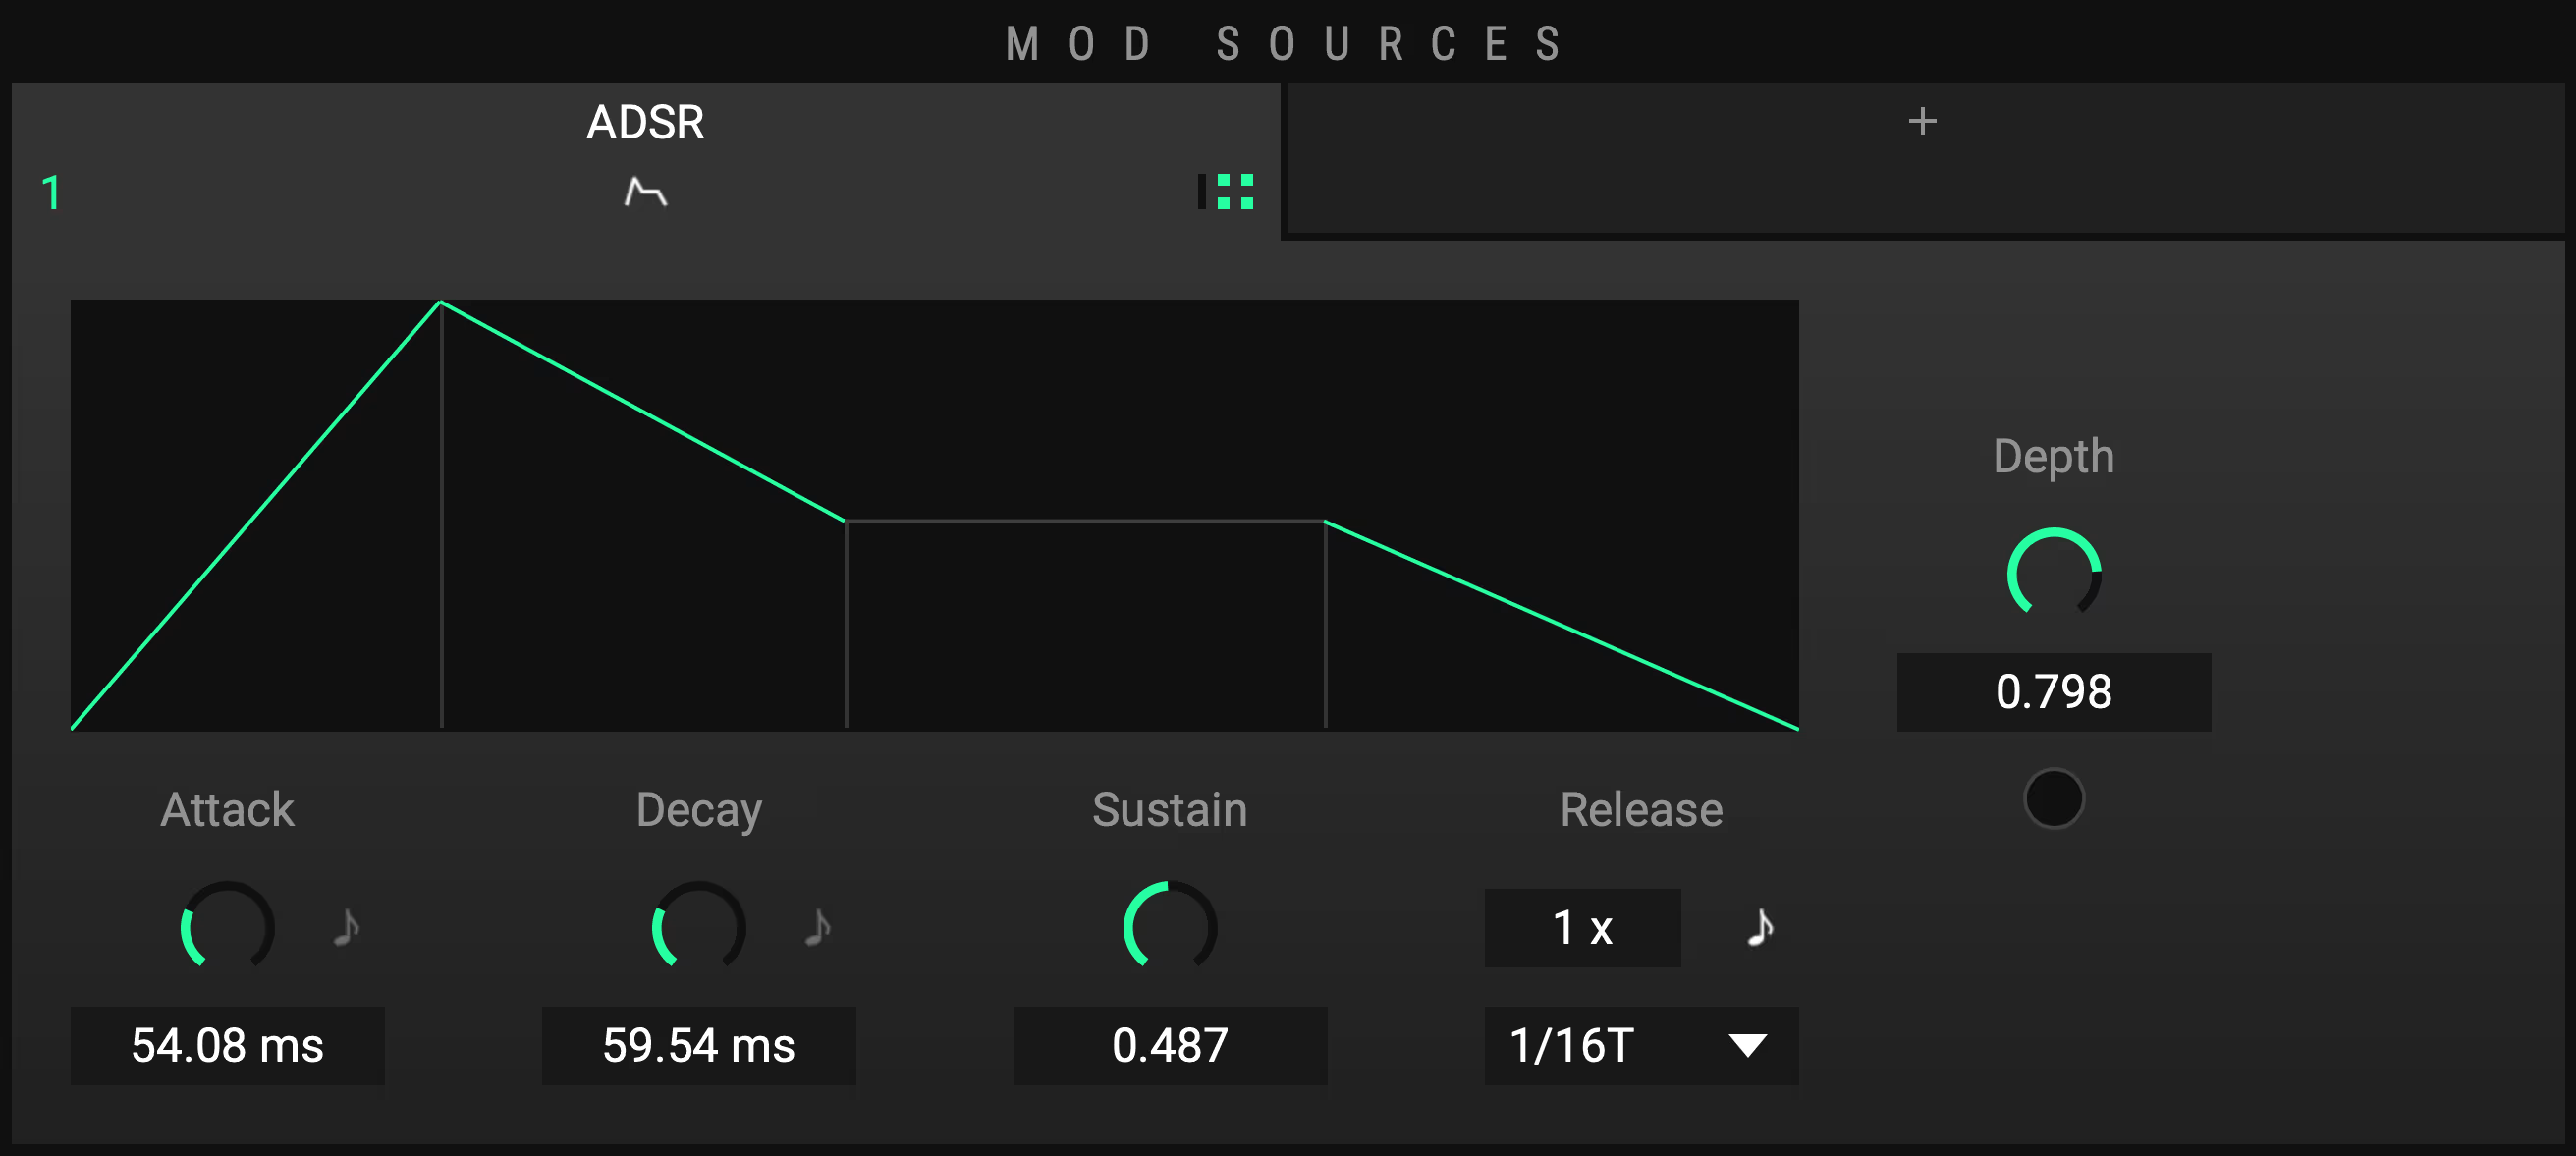
An envelope MOD SOURCE describing a change over time. Attack displays the time taken to run up from zero to max. Decay sets the time to run down onto the sustain level. Sustain, the only value not describing time, sets the output level of ADSR during the Sustain period. Release describes the time to run down from the sustain level back to zero. ADSR needs to be triggered either via audio triggering or MIDI triggering (see CONTROL). As opposed to CURVE, which simply plays back the value it is set to and upon retriggering starts back from the beginning, ADSR will rise to max from the current value within the Attack period. Respectively, when releasing before Attack has finished, the Release will start from the current value.
MAPPING
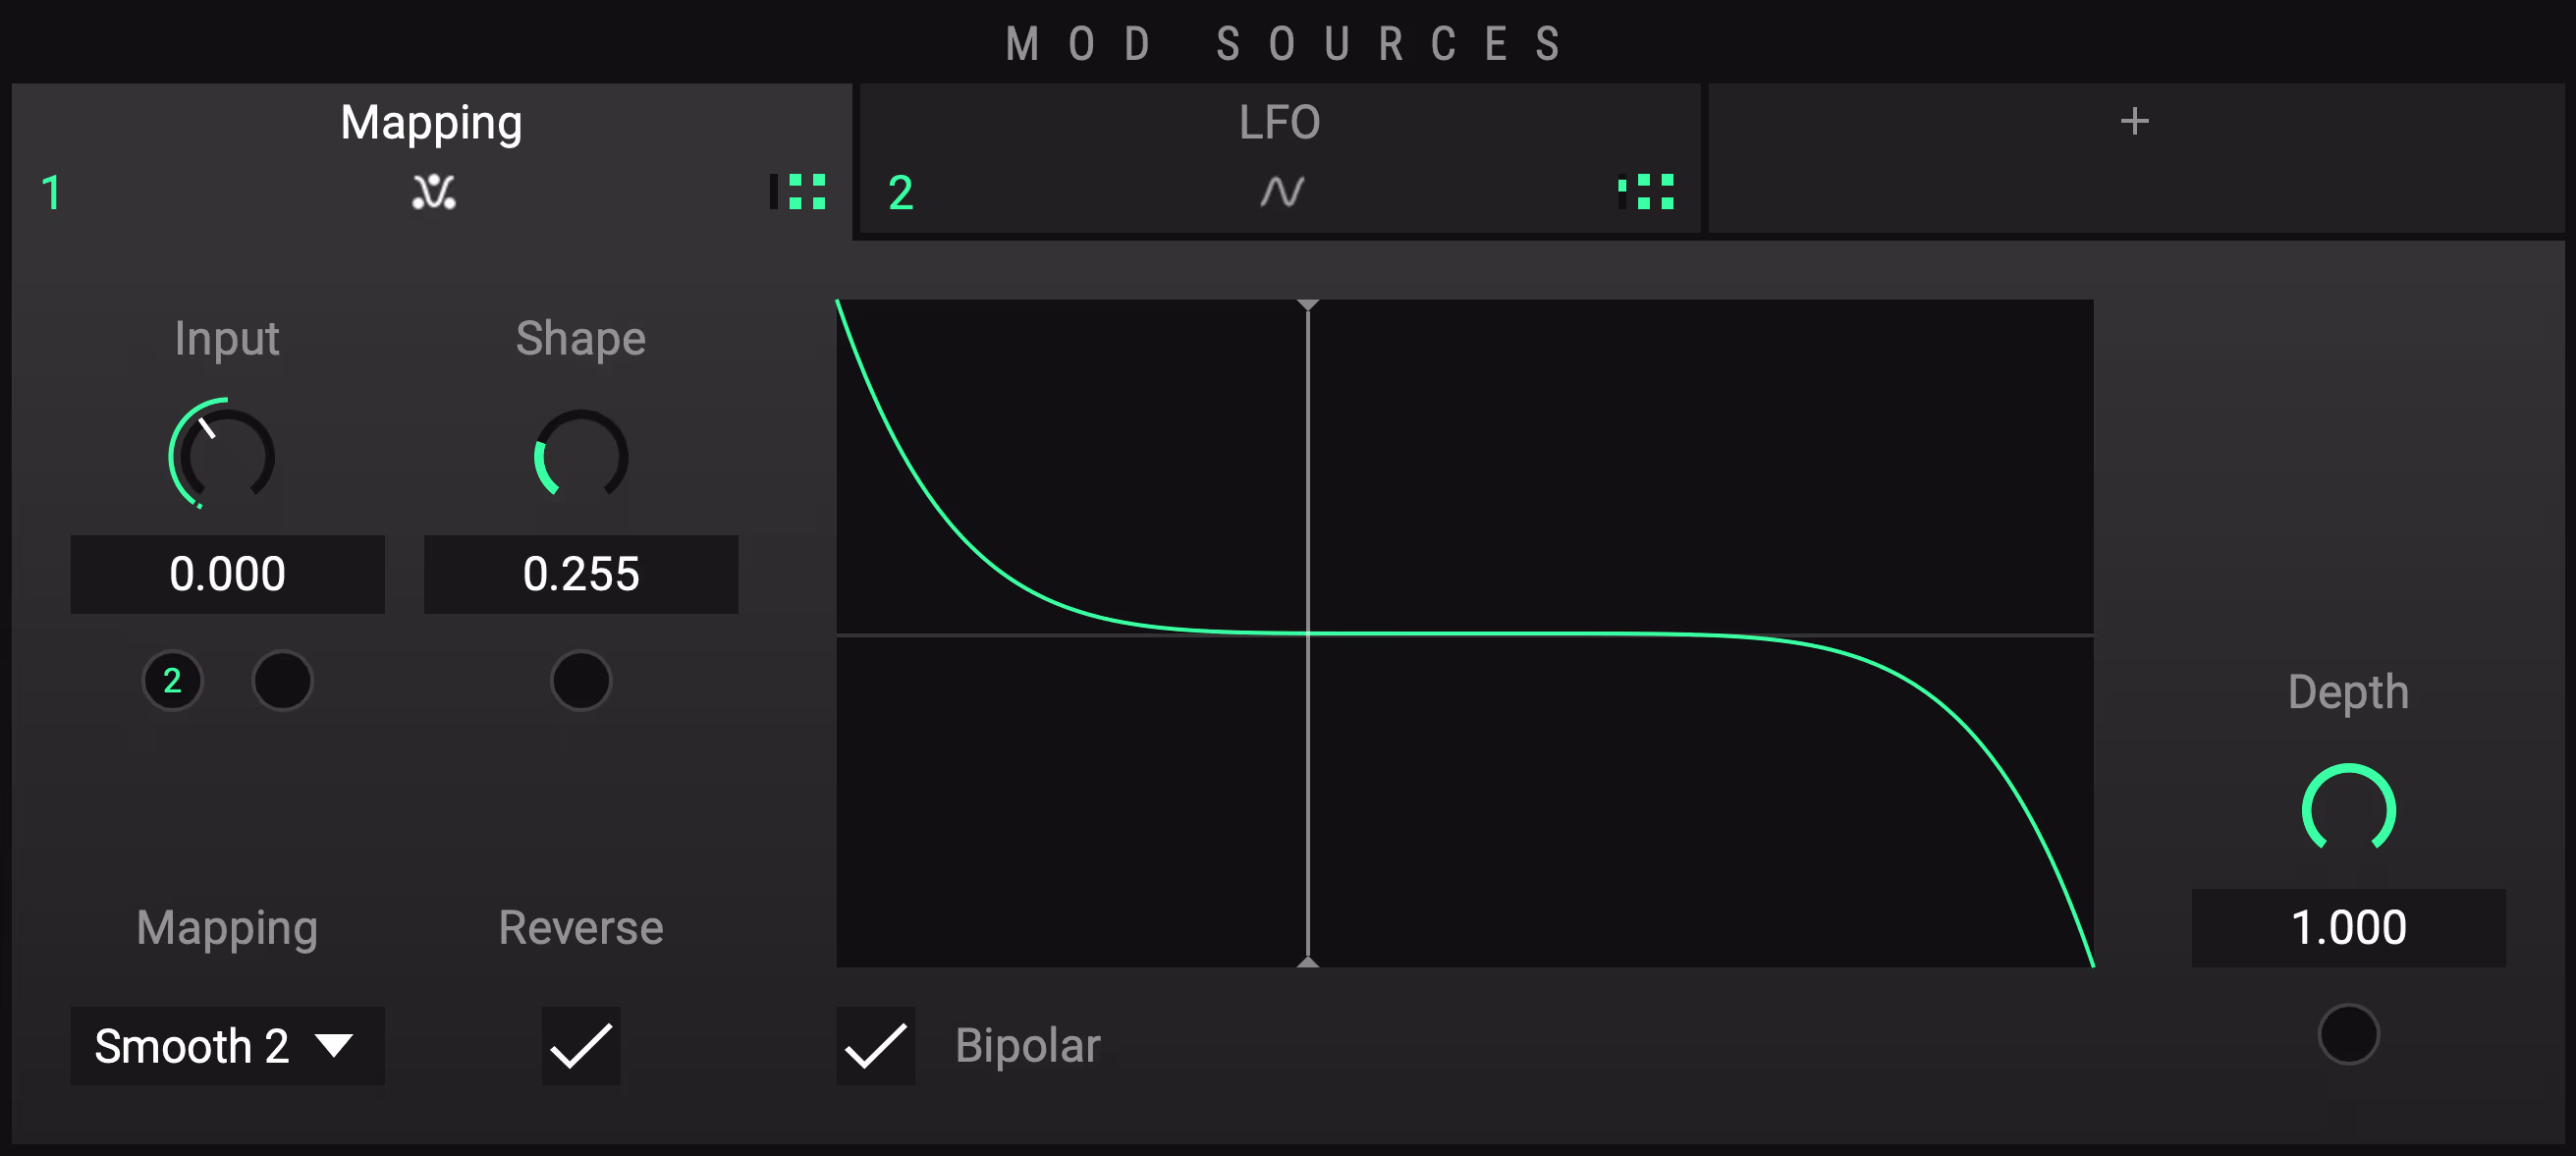
Another mighty MOD SOURCE which allows you to map other mod sources to a new value with a custom curve. However, instead of being triggered, it must be modulated by at least one other MOD SOURCE or one (or several) of the MACROS. This way you can create an inverted version of an existing LFO for instance.
TRANSIENT
Transient analyzes incoming audio for sudden increases in volume and outputs those changes in dynamic as an envelope. A sudden increase in volume will result in a spike, which you could apply to a Gain device in order to implement a transient shaper for example.
Gain and Offset
The stronger / more sudden the increase, the higher this spike will be. Adjust the Range according to your input material using Gain and Offset to prevent overshoots.
Time
The Time setting specifies a release time for this envelope, you can think of it as "snappiness".
Skew
With Skew, you can further change the shape of the detected envelope.
Source
Source lets you specify the input, Transient should analyze. This by default is the Main Input. You can alternatively use a Sidechain (SC In) or Tap as input sources.
Filter
An additional filter similar to the one of the Envelope Follower and Trigger Detector in the CONTROL section, that helps focusing the analysis on a particular frequency range.
CHANGE
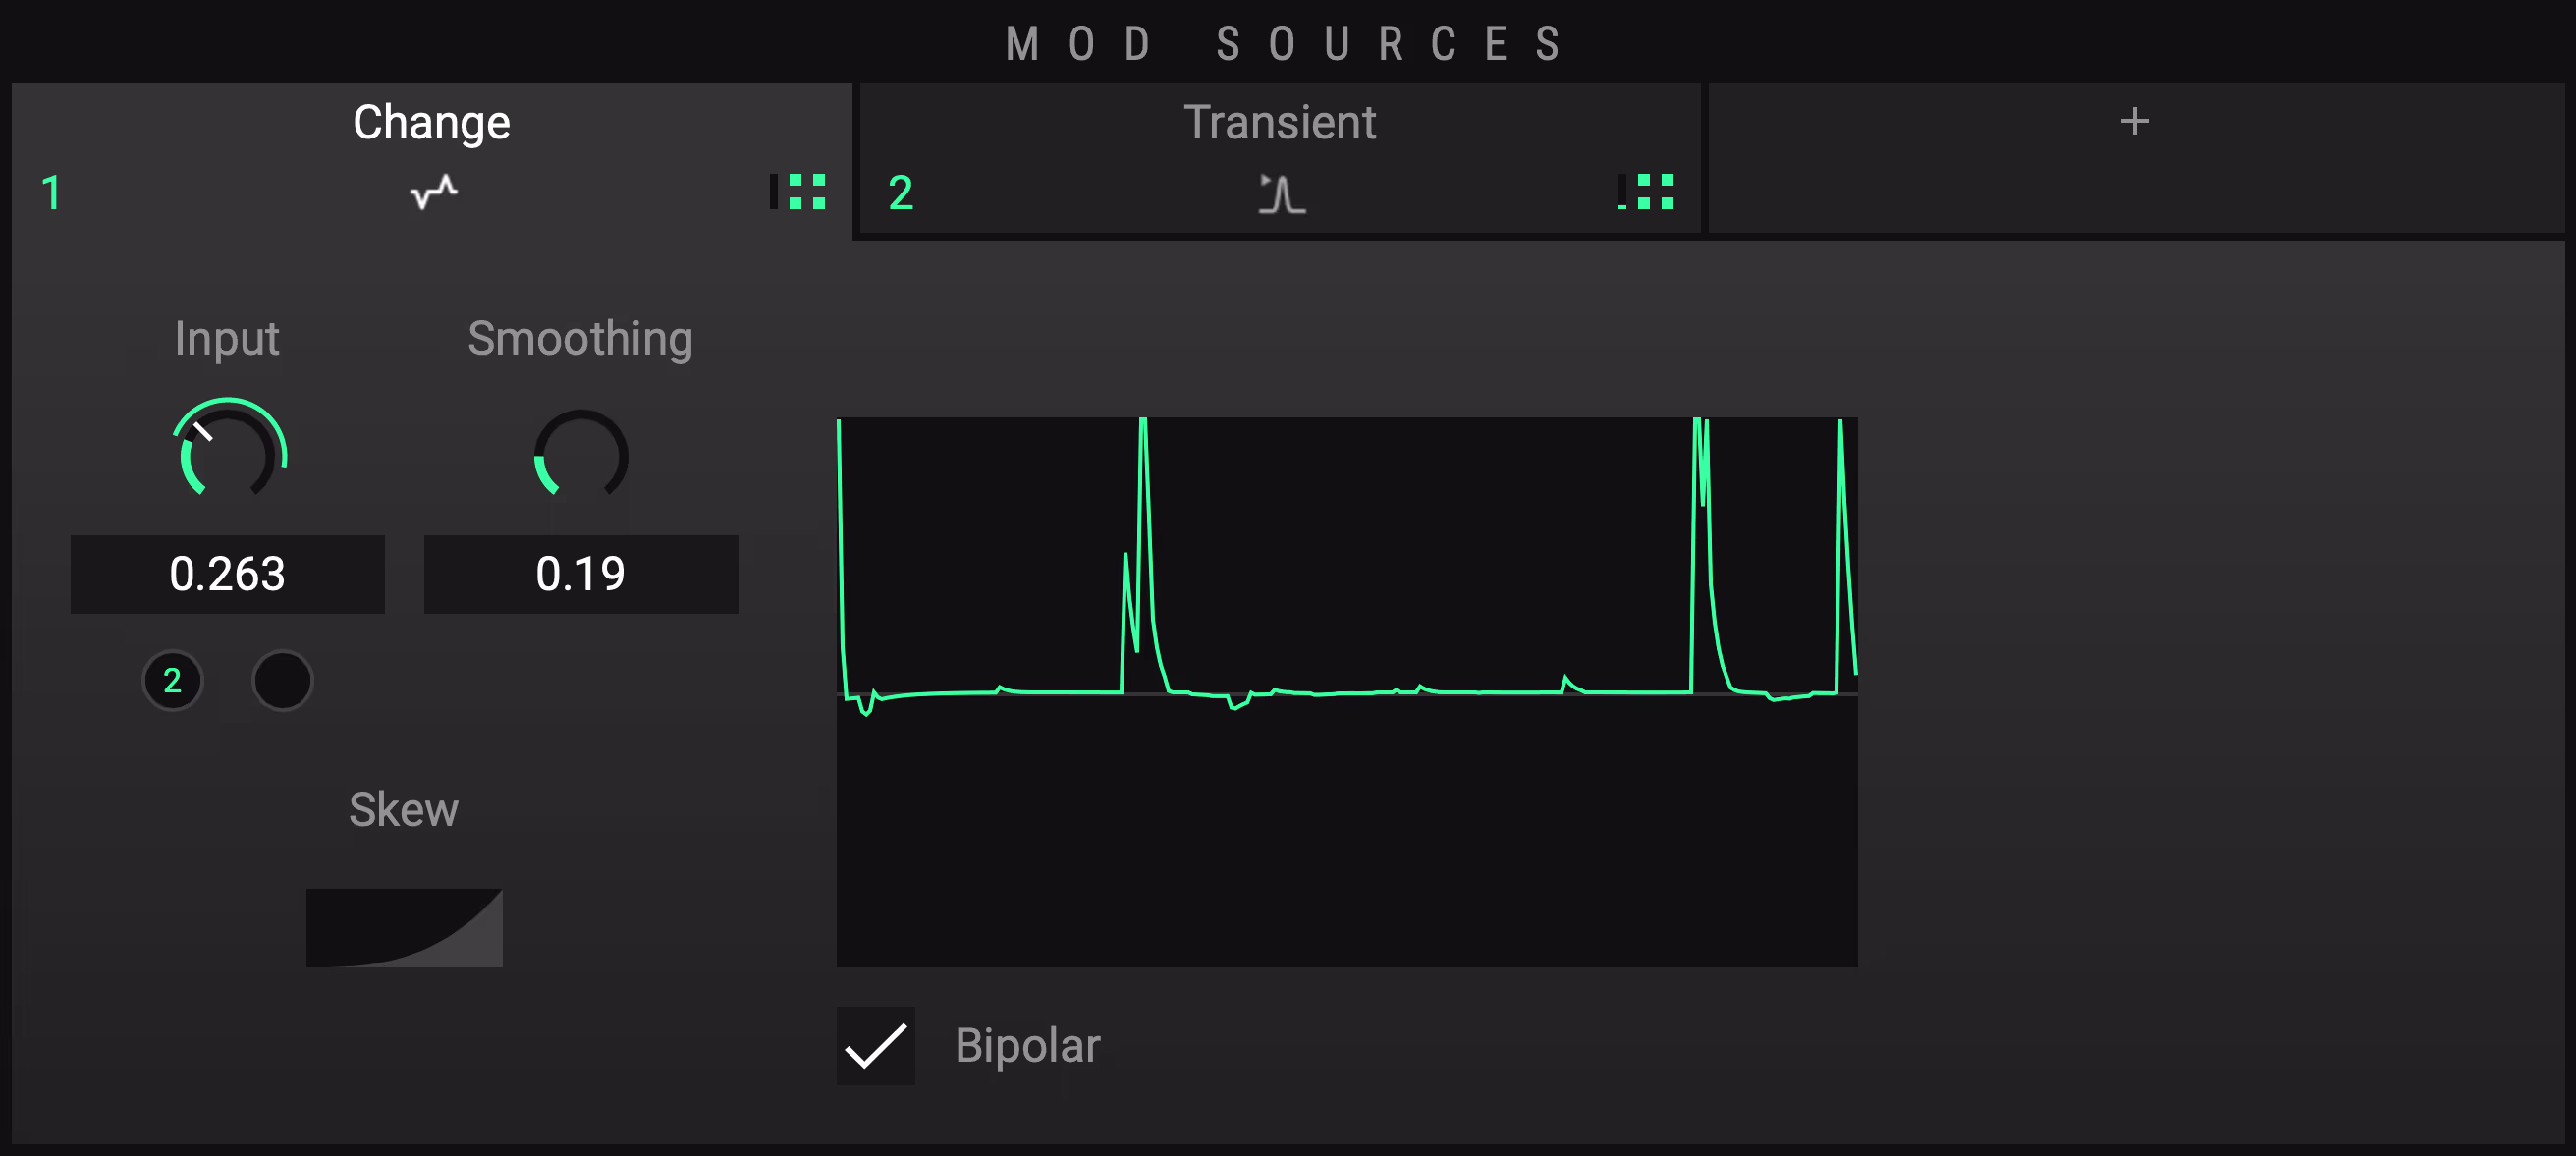
Change analyzes the change of any input data. If the input goes up, the change mod source will output how fast it goes up - vice versa, if the input goes down, the change mod source will output how fast it does that. Wiggle the input knob and you'll get the idea. Select which input or even combined inputs it should analyze. Use the Envelope Follower for instance, to create your own transient detector. With Smoothing you can control abrupt or too quick behavior to create more useful output values. Skew again controls the sensitivity and with Bipolar you can set output values around 0.500 or create a range from 0.000 to 1.000.
PITCH TRACKER
The Pitch Tracker analyzes the pitch of an incoming, monophonic signal.
Input
Select the input source that you wish to be analyzed. This by default is the Main Input. You can alternatively use SC In or Tap.
Root Note
You also must provide a range, which is defined by setting a root note and a range of semitones. E.g. if you set Root Note to C2 and Range to 24 semitones, a detected pitch of C2 will result in output value of 0, C3 outputs value 0.5, up to C4 with the output value of 1.
Qual. Thresh
Because the Pitch Tracker is very sensitive and might behave erratically if the signal is too noisy or if it is not composed of one clearly identifiable fundamental frequency, you can define a quality threshold. The Pitch Tracker will only update its output if the detection quality is above this threshold. Experiment with this value in combination with Smoothing to get optimal results for your input material.
Output
Alternative to the detected pitch, you can set the Pitch Tracker to output Clarity instead. In this case, the output will be the "Pureness" of the detected signal. The more tonal and clean it is, the higher the output.
FORMULA
A MOD SOURCE that lets you generate modulation values by using mathematical expressions. If you are one of the craftier types, you will surely love this.
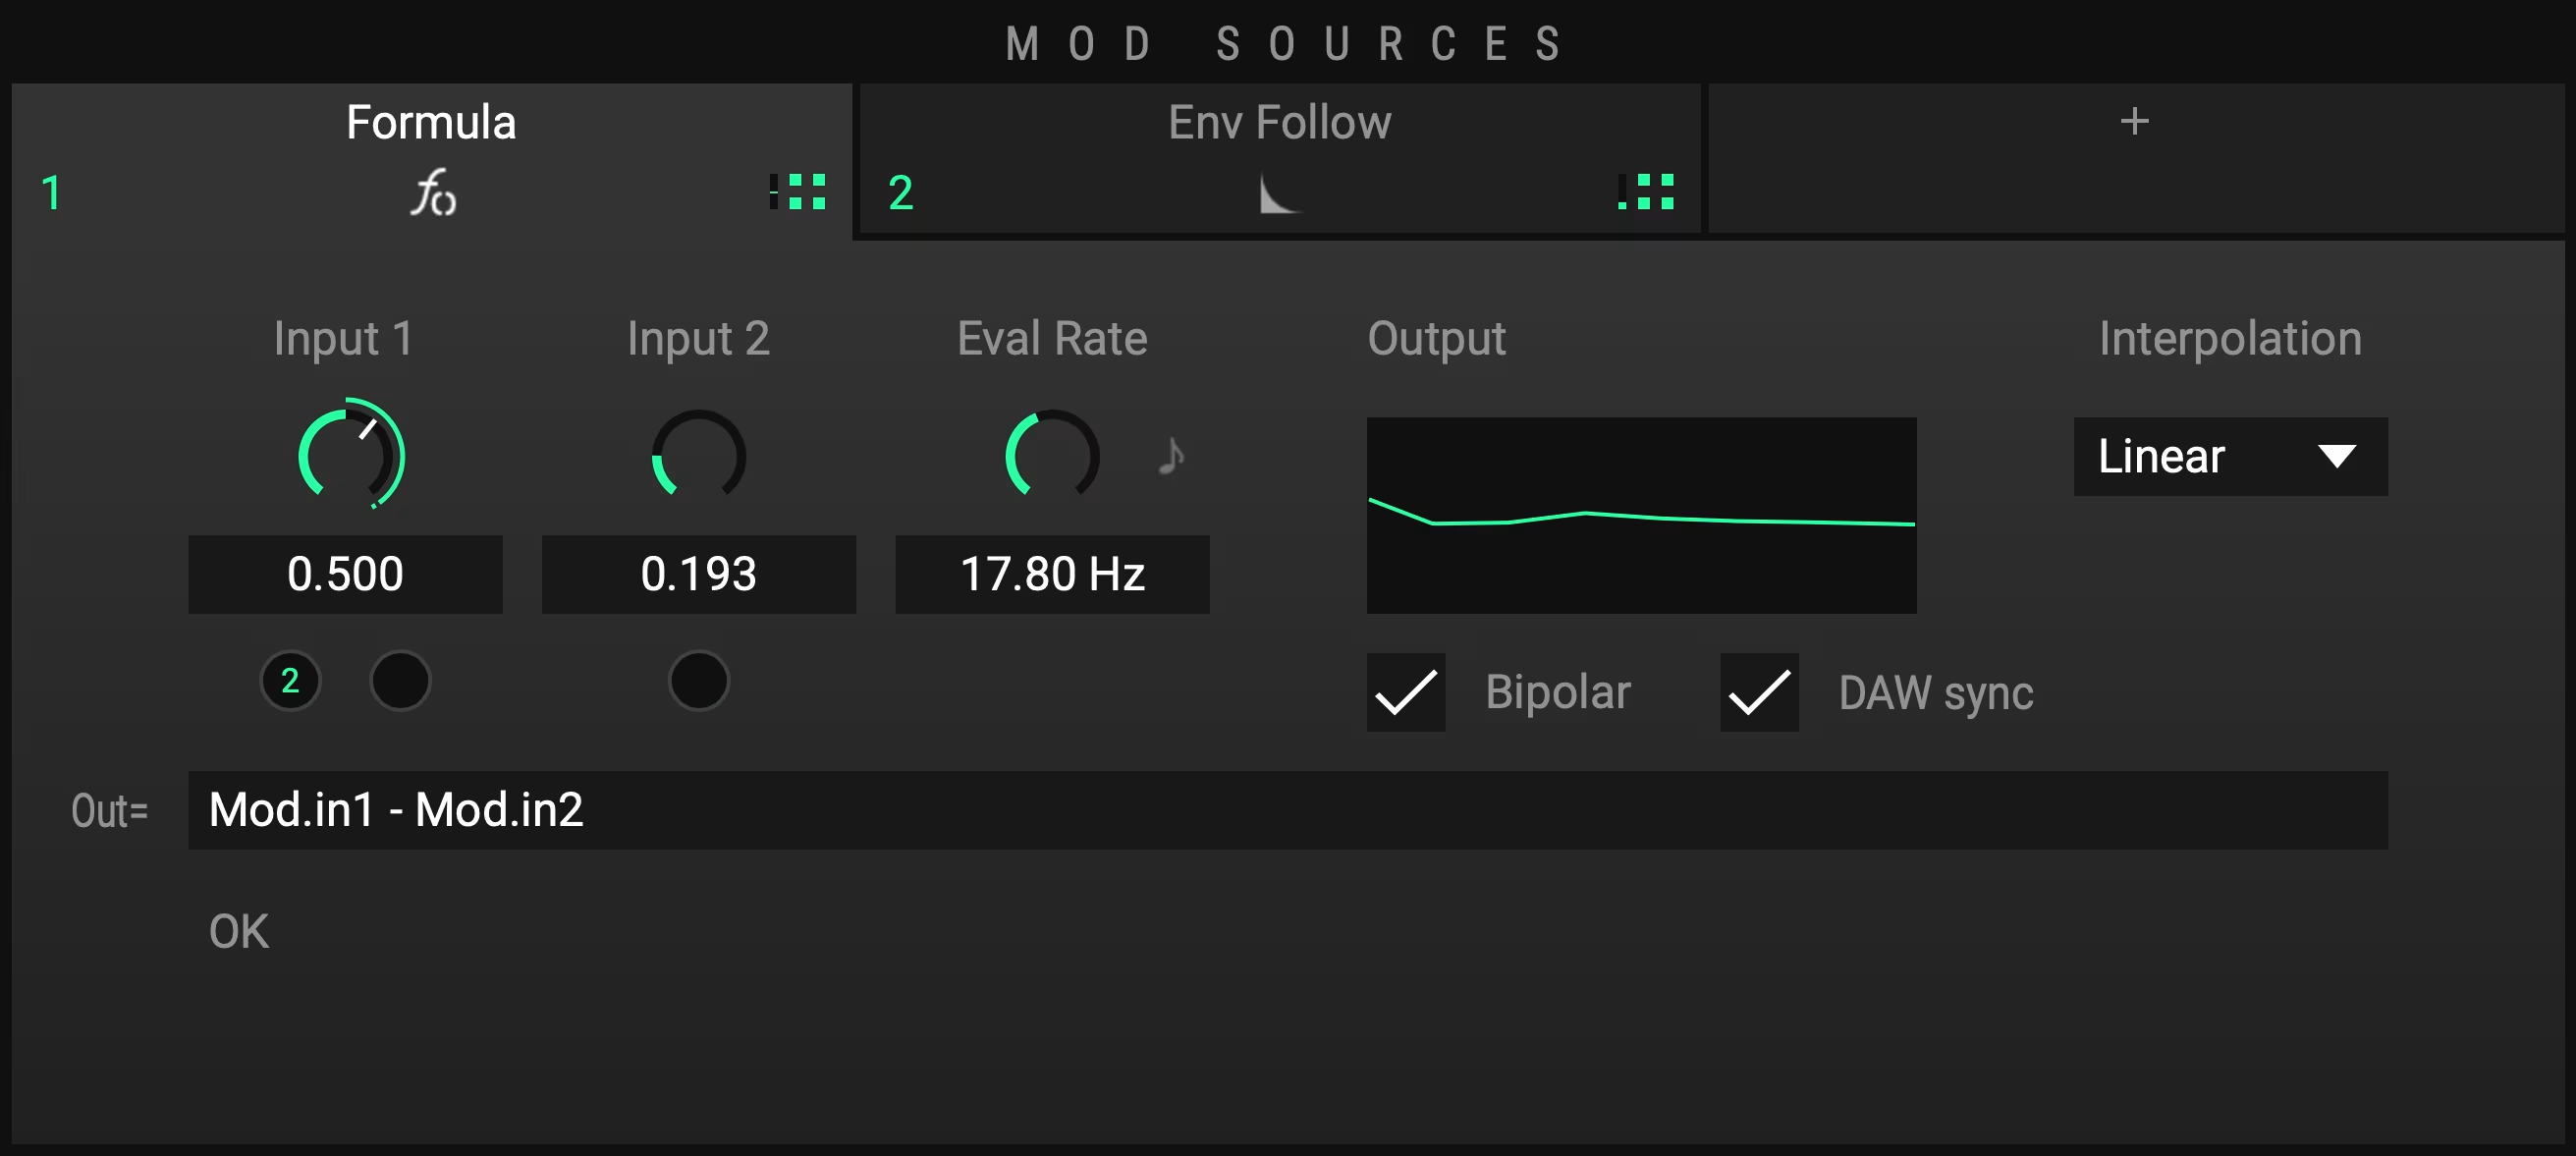
Input
You can use 2 separate input modulation values simultaneously and combine them in whatever way you want. To get started just grab a modulation value and pin it to one of the inputs the same way you would set up a MACRO.
Eval Rate
Right next to the inputs you will find an evaluation rate parameter with which you can set the rate in which the output value gets reevaluated and updated. You set the rate in frequency or note length by clicking on the note icon.
Output
The small window next to Eval Rate will visualize the modulated value. Right next to it you will find Interpolation where you can either set the drawn line to Step or Linear. Additional settings are a Bipolar display set by default and optional DAW sync.
Out= / Mathematical functions
Think of the Out= tab as it were a calculator. Type in how you wish to modulate the input values Mod.in1 and Mod.in2. You can also use the previously generated output value Mod.out. Find all supported functions in chapter 6.2.
Example Use cases:
Sample and Hold: Assign any other MOD SOURCE to Input 1, type "Mod.in1" into the expression text editor. Set Interpolation to Step and reduce the Eval Rate.
Smooth: Assign any other MOD SOURCE to Input 1, then use the expression: "0.01 * (Mod.in1-Mod.out) + Mod.out"
DELAY
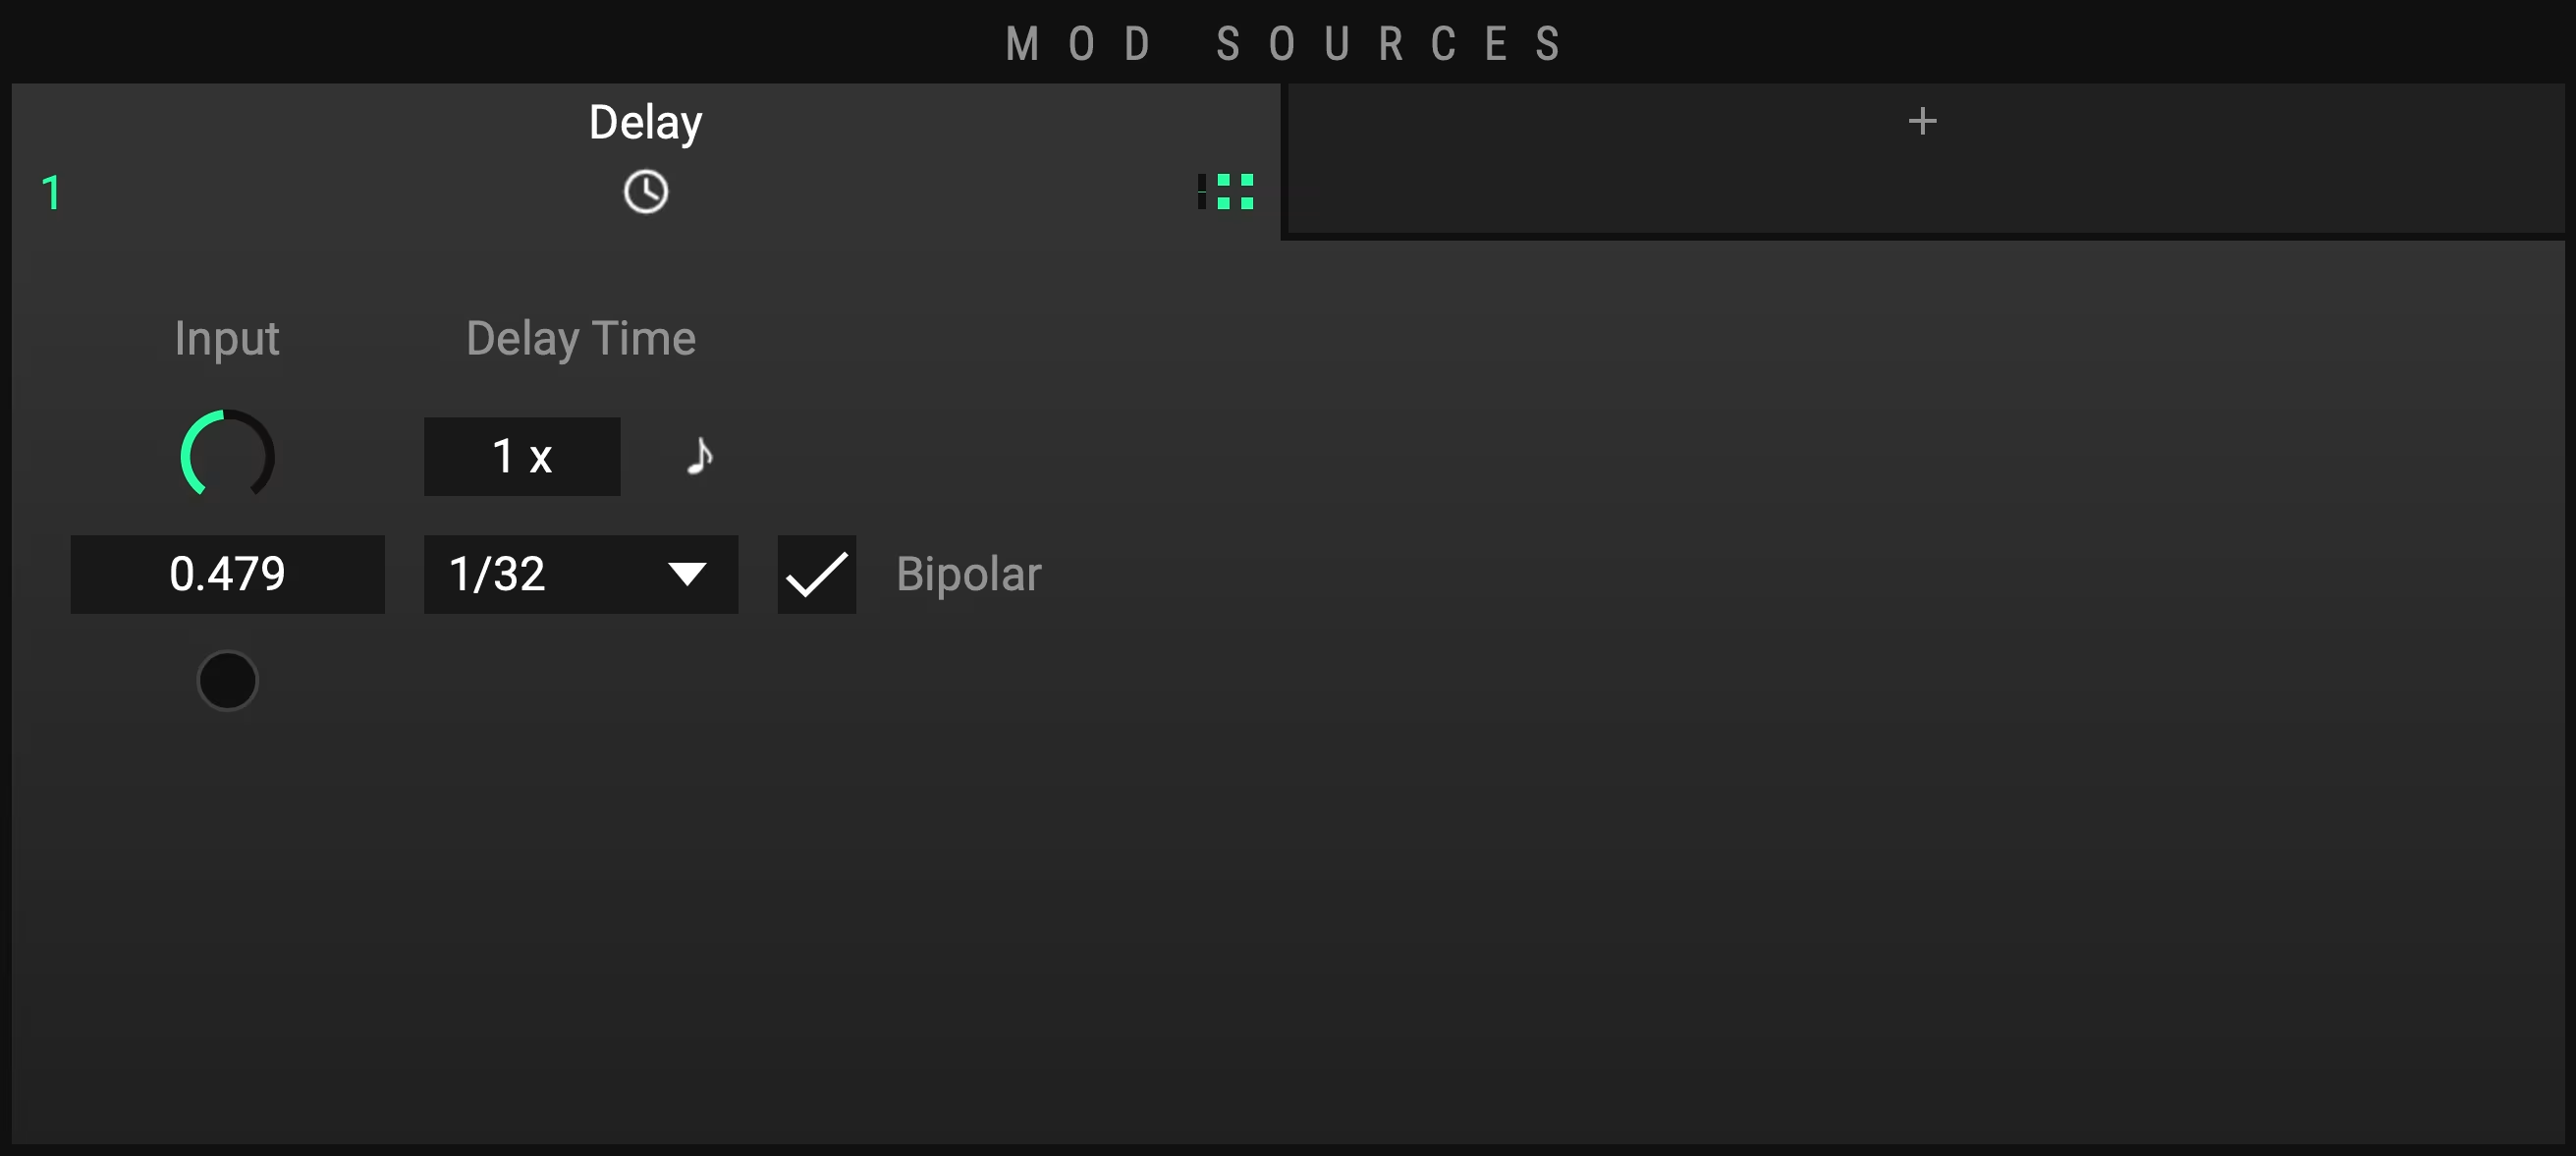
Delay allows you delay other MOD SOURCES (input) by setting the Delay Time either in hertz or in notes synched to your host. Input represents the value that is going to be delayed. This parameter can be modulated as well. Assign any other MOD SOURCE to Input to delay it by a specific amount of time.
SMOOTH
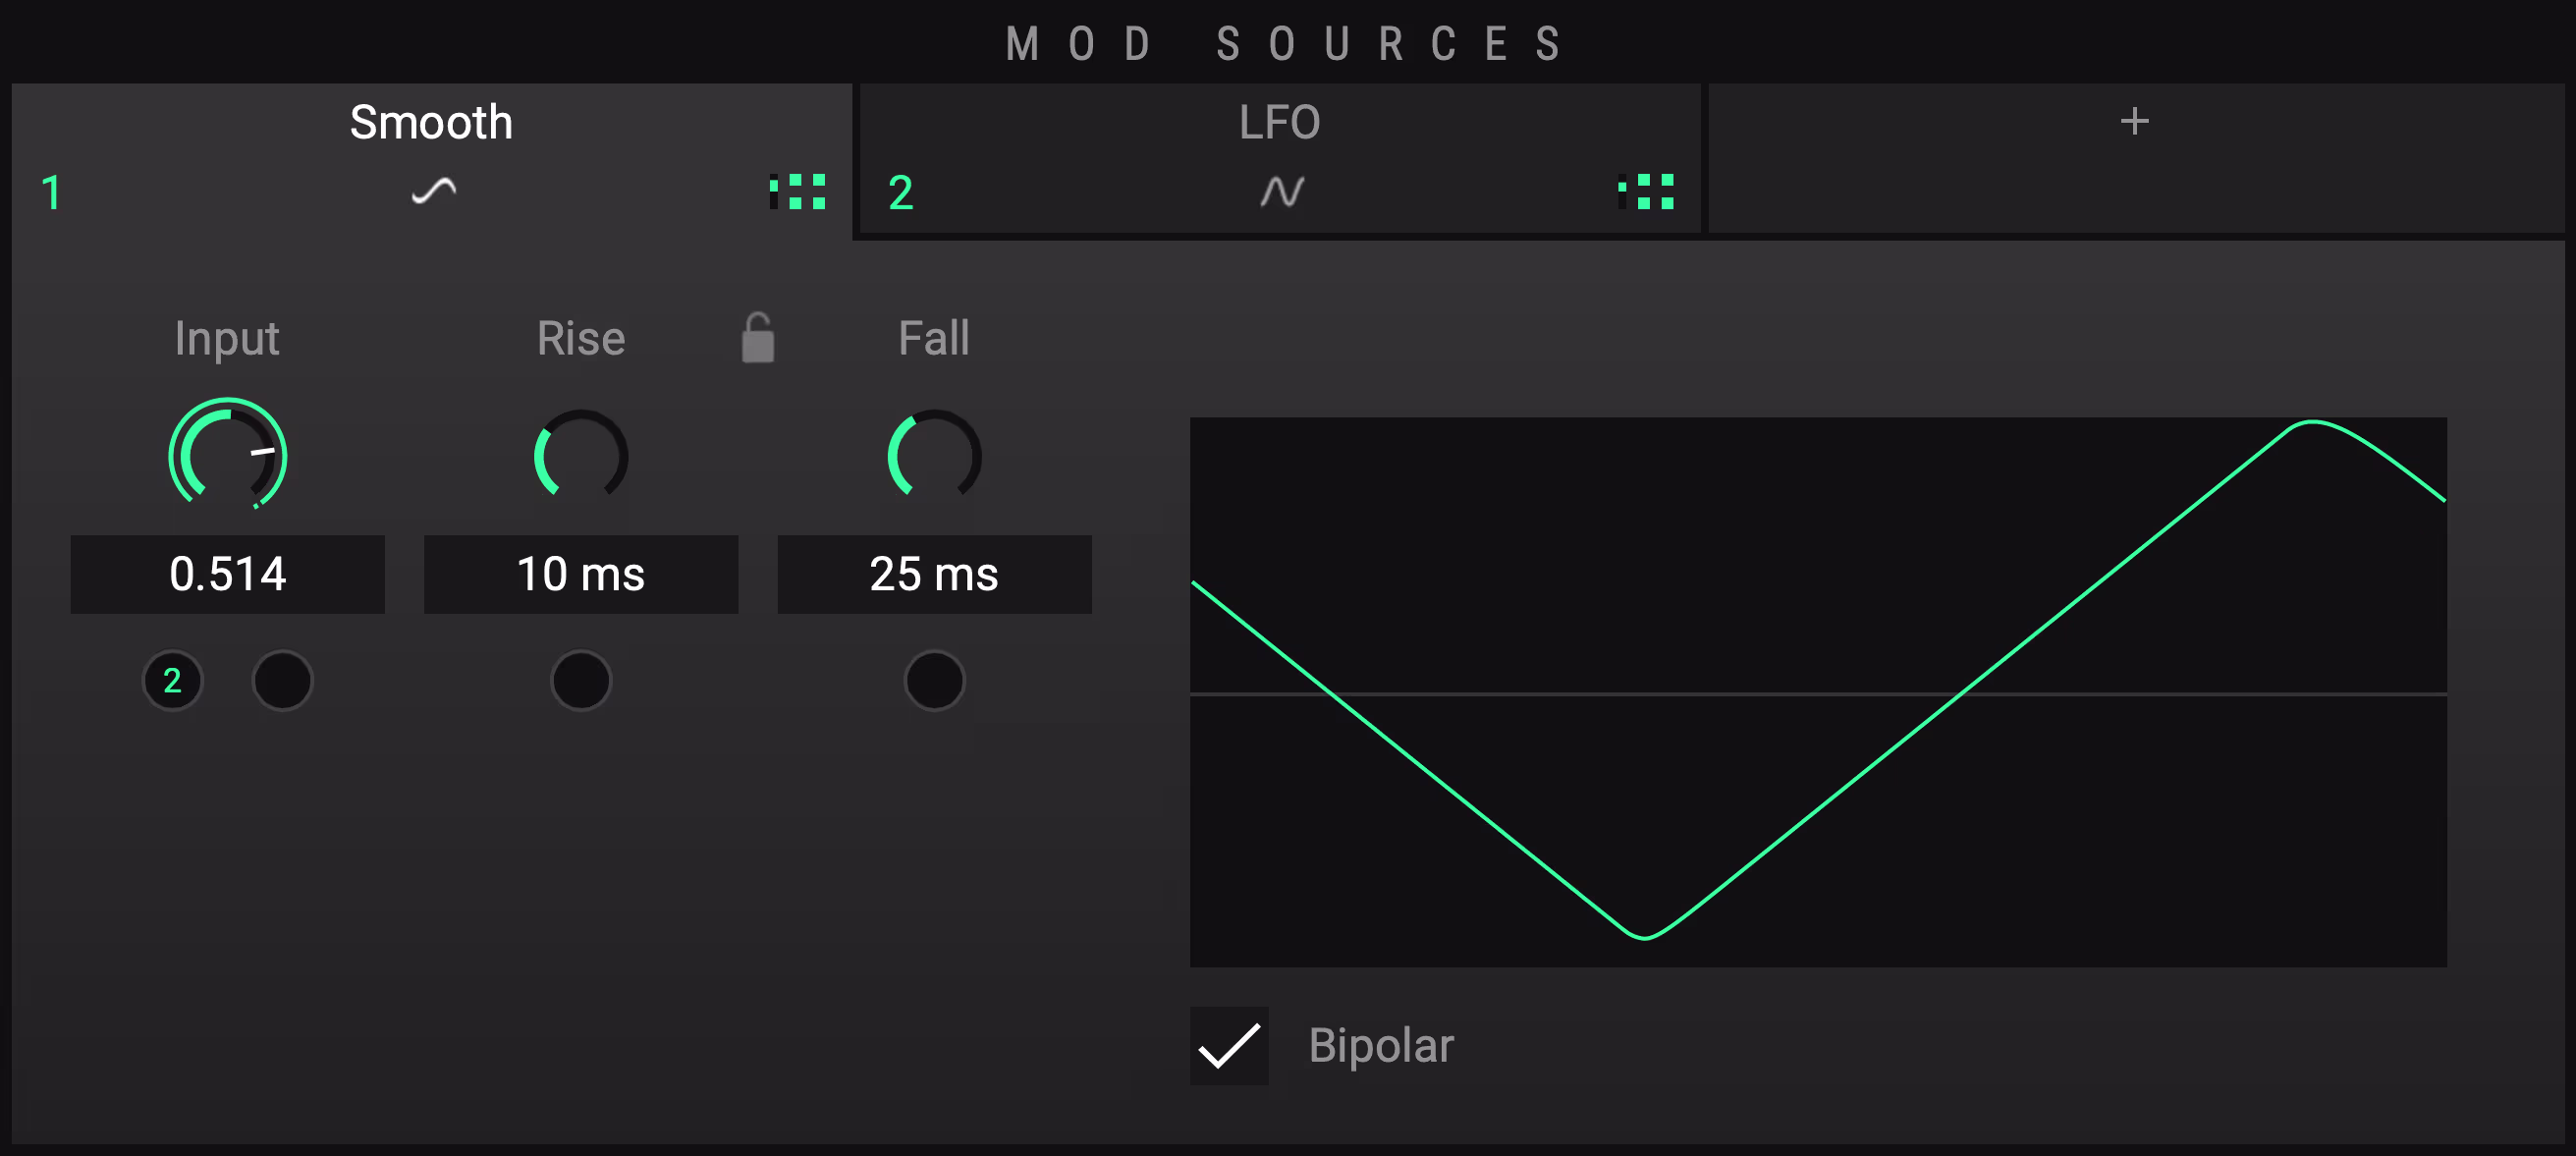
This MOD SOURCE smoothens the Input modulation value of your choice with adjustable Rise and Fall times which can also be modulated. Link these two parameters by clicking on the lock icon located between them. With rise and fall times linked, the MOD SOURCE is effectively a low pass filter for modulation.
Tip: Increase Smootheness
Put multiple Smooth Mod Sources in series to achieve even smoother curves.
SPRING
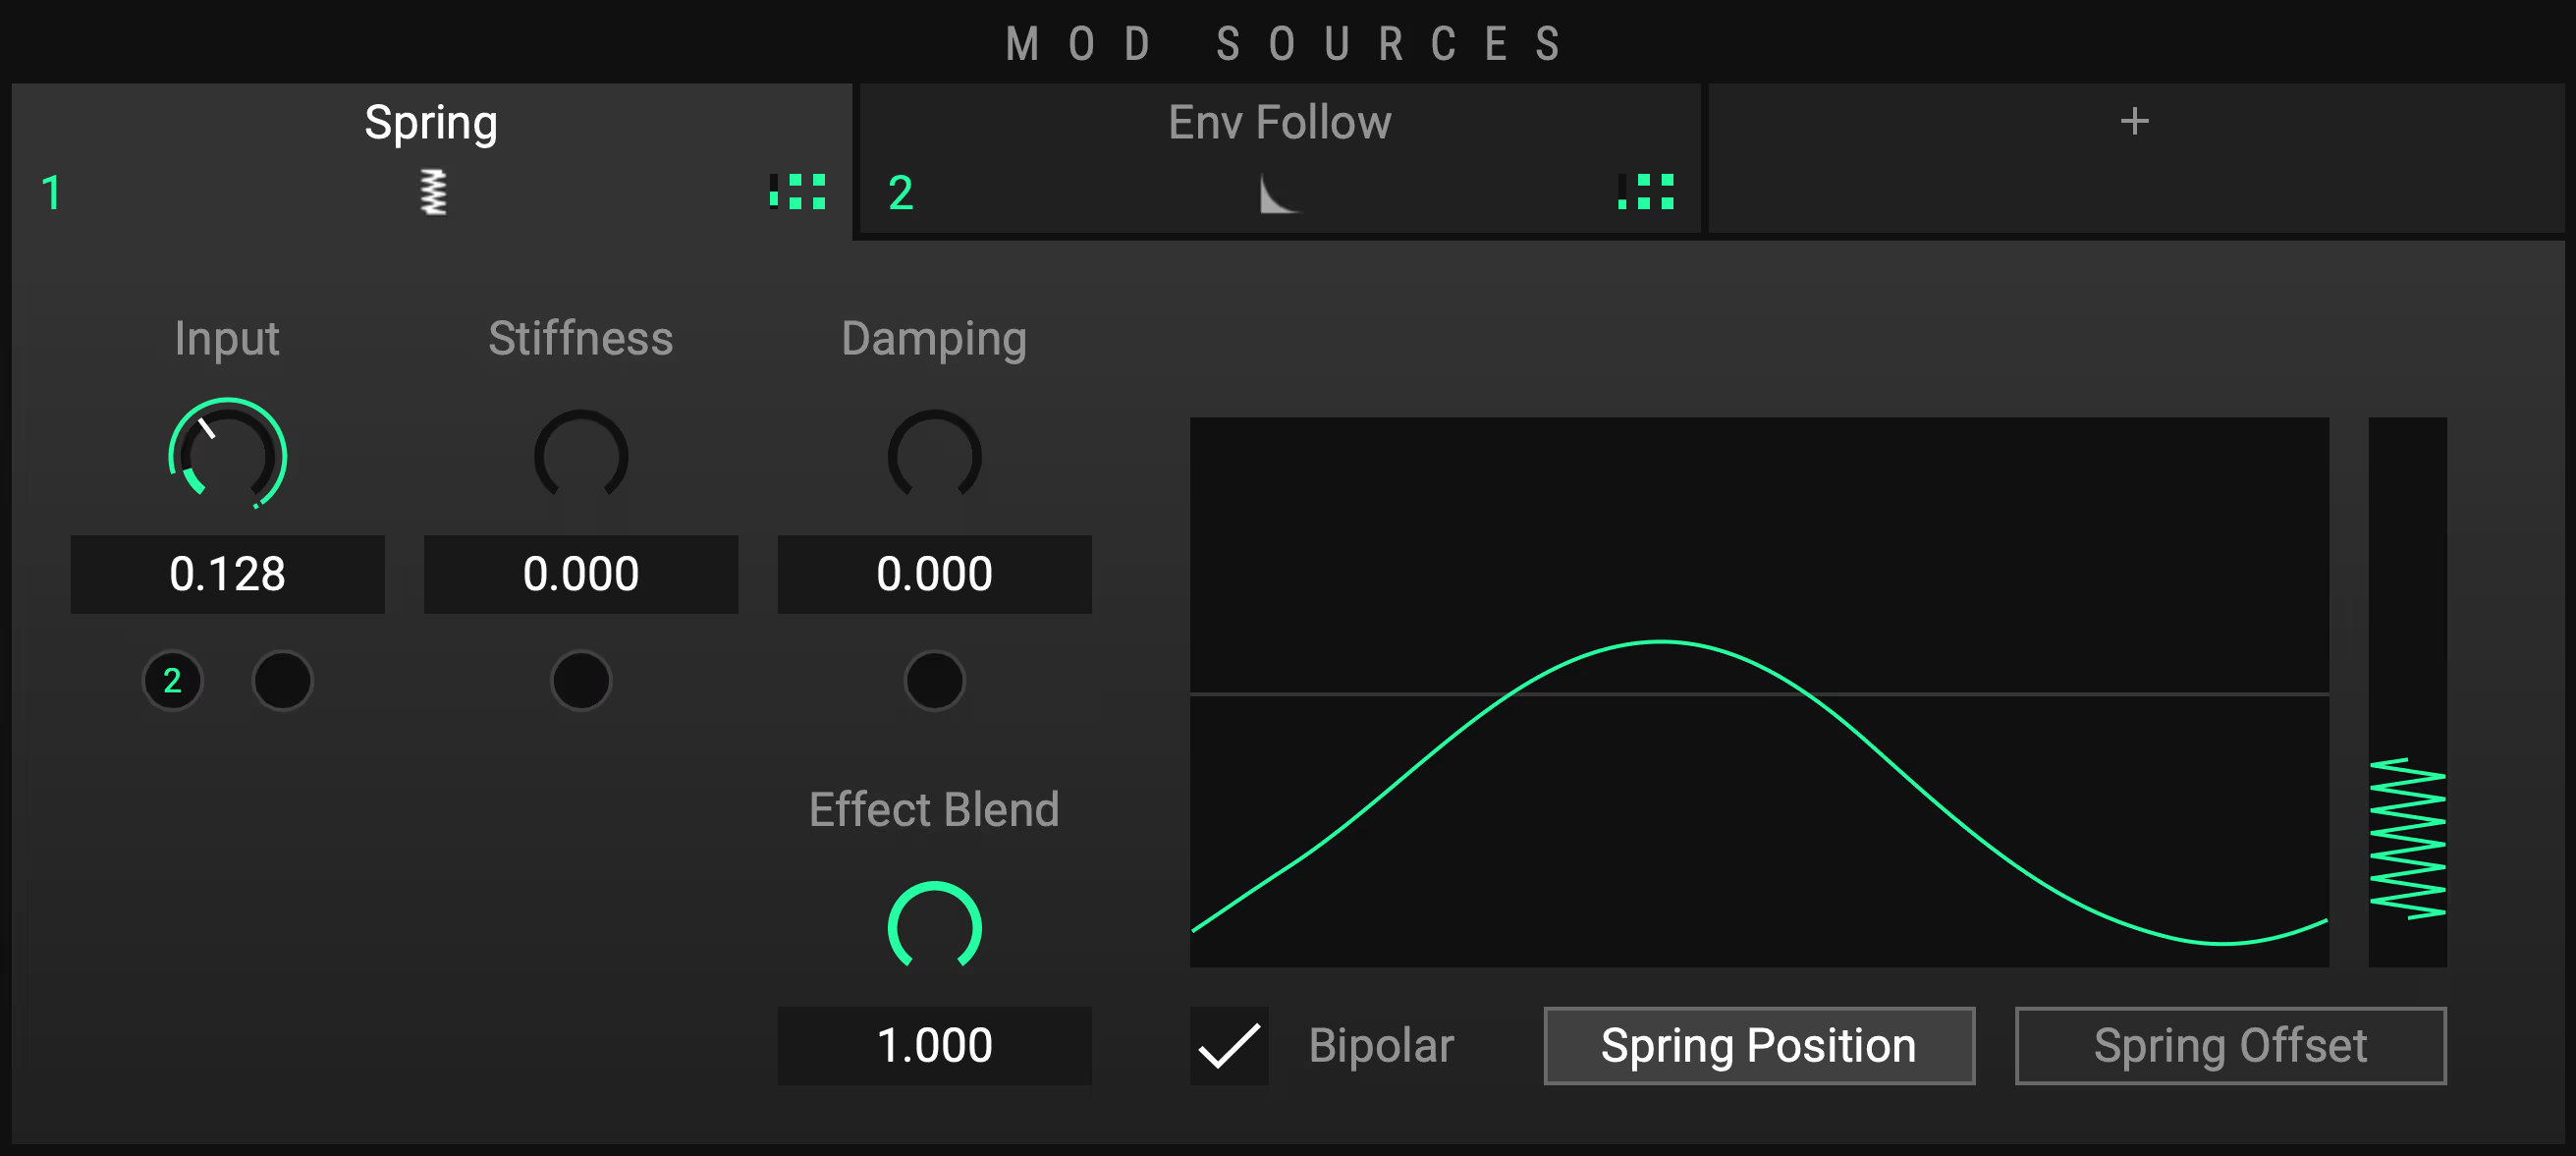
With Spring you can apply spring physics to the Input modulation value of your choice. Adjust the performance by tweaking or modulating the Stiffness and Damping controls and dialing in the overall Effect Blend. You can also switch the mode from Spring Position (default) to Spring Offset. Along with the option to toggle Bipolar output values, this MOD SOURCE can create interesting overshoot and bounce-back effects.
TIPS AND TRICKS
General Usage
ENRAGE will enable you to approach situations where you find yourself stuck. In other words, if you don’t know how to solve an issue (whether it be mixing or sound design), try ENRAGE before you end up enraging.
Know what you aim for
Not having an aim will certainly lead to confusion. Since this Plugin is offering a huge variety of creative possibilities, it is even more important to set yourself a goal. Try think of it like you would paint a picture. Once you know what you want to paint, you’ve got a frame that you now just need to fill with paint. Not knowing what to paint on the other hand is this invisible barrier that keeps most of us from even making the first step. This sounds kind of philosophical, but it helps to make this point clear. If you go ahead and try to build a specific effect chain, ENRAGE will most definitely help you achieve that goal. As soon as you have become an expert painter you can of course start with a blank piece of paper and see where your pen will lead you. But until then, try sticking to the script.
Countermovement of Device parameters
While dialing in the parameters it can be very helpful to mirror your settings to reach the perfect tuning. You can do this by countermoveing them. If you feel like there is too much low end for instance, try boosting the higher frequency spectrum instead of cutting out too much bass. Or do a bit of both. ENRAGE is offering loads of possibilities in this regard as you can easily set up macros to automate several device parameter movements simultaneously.
Quality of life - Shortcuts
Regarding the modulation assignment of MOD SOURCES and MACROS ENRAGE offers some neat shortcuts to optimize your workflow.
Hover Highlight
Hovering over a modulation assignment icon will highlight every target it is already assigned to. If the targeted MOD SOURCE or DEVICE is selected, it will also highlight the specific target value.
Drag on Target
Dragging the modulation assignment icon on a MOD SOURCE or DEVICE will open its editor after a short delay to further assign it to the target value of your choice.
Double-click on Icon
Double clicking on the modulation assignment icon of the MOD SOURCE will open already assigned targets one after another. This will come in handy when working with rather complex templates.
Double-click on mod assignment
Double clicking on a modulation assignment will remove it.
Replace mod assignment
Ctrl-dragging on existing mod assignments will replace all previous assignments.
Alt / MODIFIER
Press Alt / MODIFIER and Drag DEVICE or MOD SOURCE to duplicate them.
Fine adjustment
Hold ctrl while dragging knobs for fine adjustment.
Snapping
Hold shift while dragging knobs for value snapping.
Reset Knob Values
Reset knobs to their default values by simply double clicking on them.
Curve Editing
- Shift-dragging a curve point will snap it to the grid.
- Shift-dragging a curvature modifier handle (empty circle) will snap it to a fixed step size
- Alt-dragging a curve point will symmetrically move the opposite point in the opposite direction
- Alt-dragging a curvature modifier handle will set the following curvature handle to the opposite position
- ctrl/cmd-alt-dragging a curvature modifier handle will set the following curvature handle to the same position
Note that these actions apply to all curve editors.
Add Modifier
Right-click on a MOD SOURCE and select Add Modifier in the popup menu to automatically set up a modifier MOD SOURCE.
FORMULA Functions
For every Function insert the prefix: “Math.” Here is one example: “Math.abs(x)”
| Function | Description |
|---|---|
| abs(x) | Returns the absolute value of x |
| acos(x) | Returns the arccosine of x, in radians |
| acosh(x) | Returns the hyperbolic arccosine of x |
| asin(x) | Returns the arcsine of x, in radians |
| asinh(x) | Returns the hyperbolic arcsine of x |
| atan(x) | Returns the arctangent of x as a numeric value between -PI/2 and PI/2 radians |
| atanh(x) | Returns the hyperbolic arctangent of x |
| ceil(x) | Returns x, rounded upwards to the nearest integer |
| cos(x) | Returns the cosine of x (x is in radians) |
| cosh(x) | Returns the hyperbolic cosine of x |
| exp(x) | Returns the value of Ex |
| floor(x) | Returns x, rounded downwards to the nearest integer |
| log(x) | Returns the natural logarithm (base E) of x |
| max(x, y, ...) | Returns the number with the highest value |
| min(x, y, ...) | Returns the number with the lowest value |
| pow(x, y) | Returns the value of x to the power of y |
| random() | Returns a random number between 0 and 1 |
| round(x) | Rounds x to the nearest integer |
| sin(x) | Returns the sine of x (x is in radians) |
| sinh(x) | Returns the hyperbolic sine of x |
| sqrt(x) | Returns the square root of x |
| tan(x) | Returns the tangent of an angle |
| tanh(x) | Returns the hyperbolic tangent of a number |
| E | Returns Euler's number (approx. 2.718) |
| LN2 | Returns the natural logarithm of 2 (approx. 0.693) |
| LN10 | Returns the natural logarithm of 10 (approx. 2.302) |
| LOG2E | Returns the base-2 logarithm of E (approx. 1.442) |
| LOG10E | Returns the base-10 logarithm of E (approx. 0.434) |
| PI | Returns PI (approx. 3.14) |
| SQRT1_2 | Returns the square root of 1/2 (approx. 0.707) |
| SQRT2 | Returns the square root of 2 (approx. 1.414) |
TUTORIALS
In this section we will create some fun presets together which will reveal the general workflow as well as some tricks and usage tips. We want to equip you with the basic principles of this mighty tool, so you get an idea of what ENRAGE is truly capable of.
Flanger
Flanger Basic
We do have an amazing sounding Flanger device on board. Let’s see how this goes!
- Open ENRAGE. On the lower left in the devices list select the Modulation Category.
- Drag and Drop Flanger onto the Gain device already located on the grid to your right.
- The signal chain should look like this: Stereo In – Gain – Flanger – Stereo Out
Now we need an LFO to make it flange!
- At the top of the GUI, go to the green colored MOD SOURCES section.
- Click the plus icon to the right of Env Follow and select LFO.
Most Flangers have a lower rate so we need to make a few adjustments here.
- Select Triangle in the LFO Type dropdown menu.
- Set the Rate Min to 0.100 Hz.
Next, we assign the LFO modulation to the Flanger device.
- Drag the () icon onto the Mod Target () located under the Frequency Knob.
- Pull the little green number up and set it to about 0.300.
TIP: Fine tune values
Hold ctrl + drag to fine tune all values.
- Right-click on Gain located above the Flanger device and select Remove.
- Right-click on the Env Follow and click Remove.
- If you are looking at something like this now, your very own Flanger is ready to use.
TIP: Don´t stop here
You can of course tweak whatever you like from here. Try out different settings and add more devices to learn more about ENRAGE‘s modular setup or read the next chapter to dive in a bit deeper.
Dynamic Flanger
Now let’s make it a bit more interesting. Thousands of ways to go from here alone. We want to present one. This is based on the basic Flanger Tutorial above. You can also load the preset “Tut01 1 Flanger” which is the result of chapter 1.1.
- Next to the LFO, use the plus icon to add an Envelope Follower (Env Follow).
- Use the Envelope Follower’s green Mod Assignment cube () and connect it to the next Frequency Mod Target () of the Flanger device right next to the green 1 of the LFO which has already been assigned.
- Now push up the 2 by taste. Like all the way up.
- What is happening now? The LFO still shifts the frequency by the given rate up and down based on a center frequency, the Env Follow on the other hand shifts this center frequency up, whenever the incoming signal increases in volume.
- Apply Env Follow to the LFO Rate Mod and push it all the way up. In addition to modulating the center Frequency of the Flanger, you now also modulate the LFO speed which is responsible for the Flanger-effect.
- Interesting, but probably too cartoony. No problem. Use the same Env Follow again and assign it to the Flanger Dry/Wet. Pull it all the way down so the behavior from above still applies, but the louder the input, less of the effect is mixed in. It should now look like this:
TIP
These Tutorials only show some workflows. Try to apply these patterns to other topics. For example, exchange Flanger with the Basic Verb, instead of Frequency modulate Dry/Wet and instead of the Dry/Wet of the Flanger modulate the Size of the Reverb. Or simply use Gain to create a stutter effect which reacts faster to higher input loudness. You get the idea.
Vocal Doubler
Vocal Doubler Basic
- Open ENRAGE. From the Device list on the left, select the Delay section and drag and drop the Tape Delay onto Gain.
- Set Mode to Ping Pong and Max Delay to 75ms. Done.
- To change the timing of the doubled voices, you can either pull down Delay Mod or push it up. It changes the value from Min Delay (in this case 0ms) to Max Delay (in this case 75ms).
Vocal Doubler Advanced
The vocal doubler above already spreads out the signal in the stereo field. But is there a way to make it more interesting, shiny, smooth? Of course there is! A million ways. Here is one.
- Go to the device list, click on Imaging and drag and drop M/S Split below the Tape Delay.
- Now place an M/S Merge below the M/S Split. It does what it says: it splits the Mid from the Side signal and merges the two signal streams again to regular stereo.
- Add one Gain Lin device to the Mid signal stream and one Gain Lin to the Side signal stream.
- Add a Chorus to the Side signal stream only.
- Add a Basic Verb to the Side signal stream only.
- • Will sound terrible though, we need to adjust a few things.
- Let’s start with the reverb. Set the Size to 0.100.
- Assign the green Mod Source Env Follow to the Dry/Wet of the reverb. Pull Dry/Wet all the way down to zero.
- Pull up the green 1 up to about 0.500.
- On to the Chorus. Add an LFO by clicking the + icon to the right of the Env Follow. For the LFO Type, pick Triangle.
- Apply the LFO to the Chorus Mod by dragging the Mod Assignment icon () onto the black connector () below Mod in the Chorus device.
- Pull up the green number 2 to roughly 0.300. Change the Max Depth value to 17.5 ms. Some tricky stuff going on! To wrap it up, we want to create an easy knob to dial in the whole effect, no?
Vocal Doubler Advanced Macros
We want one for controlling the dry signal only and one to dial in the effect only.
- First, select the Tape Dly device and set the Dry/Wet to 1.000 (100% wet).
- Increase the width of Stereo In and Stereo out to three columns.
- Add one Gain Lin to the third column.
- Additionally, pull up M/S Merge one row to make space for yet another Gain Lin just below M/S Merge.
- It should result in this:
- Pull down both new Gain Lin devices all the way down to minus infinite. Now when you play back, you should not hear any signal coming through.
- Drag and drop the Mod Assignment icon () of Macro 1 onto the big Gain Lin in the third column and assign it to the Gain. Pull up the magenta 1 all the way.
- Do the same with Macro 2 but to the Gain Lin in column two.
- Now you can use Macro 1 to mix in the original dry signal and Macro 2 to dial in the effect as needed. These macros can even be automated. You can for example only add a stereo effect on certain words, phrases, or parts of your project.
- If you add some useful labels to the Devices, Mod Sources, and the Macros, you will be able to recap exactly what you did. Here is one way:
TIP: Add labels to recap your idea
If you add some useful labels to the Devices, Mod Sources, and the Macros, you will be able to recap exactly what you did. You can of course tweak whatever you like from here.
BOOM Library – Software License Agreement
Single User License Agreement
(For Multi User License Agreement please scroll down)
This license agreement is an end-user agreement for single users / personal licenses. For multi-user setups / enterprise licenses, please refer to the Multi-User License Agreement, or contact us via service@boomlibrary.com
The following Single User License Agreement ("SULA" or “Agreement”) represents the contractual conditions between you ("Licensee" or "you") and BOOM Library ("BOOM", visit www.boomlibrary.com/about for the official legal company details and address) for the use of audio plug-ins or software including related media, documentation (e.g. manuals) and other documents and materials (e.g. presets) manufactured by BOOM ("SOFTWARE"). By installing and by registering the SOFTWARE on your computer, you declare yourself in agreement with these conditions. If you do not agree with these conditions, you are not allowed to install the SOFTWARE. Copyright laws and international copyright treaties, as well as other intellectual property laws and treaties protect the SOFTWARE and its content. All rights not expressly granted to Licensee hereunder are reserved by BOOM.
Section 1 – Introduction:
- What You Get:
- You get to install the SOFTWARE on up to two (2) works-stations that you, only, use. They can be your computer in an edit bay and a laptop for the field, or your computer at work (or school) and your computer at home, etc.
- Please note that you need a sequencer software to run our SOFTWARE which is not included in this license.
- You can copy the SOFTWARE only once, for the sole purpose of making a backup copy.
- If you are an educator and need a license for your lab / institutional setup please contact us for educational pricing.
- You can export, render out, re-record or otherwise save any type of sound, noise, music, pad (“work”) created with our SOFTWARE and its presets and use it as part of any video, game, audio library or other media production (“media projects”), even other people’s media projects that you didn’t do, if the works are made from the copy of the SOFTWARE in you have on your work-station(s) and used as per our SULA.
- What You Don’t Get:
- You don’t get to make any other copies of the SOFTWARE.
- Please don’t share our SOFTWARE on the internet – we are a small company, and unlicensed copies hurt our ability to make our products better for you and bring you new products in the future.
Section 2 – Ownership:
- The enclosed SOFTWARE and related instructions are licensed (not sold) to you, and BOOM retains all ownership interests and intellectual property rights in the SOFTWARE.
Section 3 – Software License:
- BOOM grants you a nonexclusive, nontransferable license to (i) install and use one copy of the SOFTWARE on up to no more than two (2) computers both of which must be owned and used by you and (ii) make one copy of the SOFTWARE for back-up or archival purposes only.
- If you have licensed a bundled product, either from BOOM Library or a third-party, that rightfully includes a version of the SOFTWARE (e.g. “read-only” player, or OEM version – hereinafter: “Product Bundle”), you don’t have to pay any additional license fee to BOOM Library in order to use the SOFTWARE with the license and version as included in this Product Bundle.
- The SOFTWARE cannot be technically installed on a network server, it is only available for individual machines. You may not:
- copy (other than for a second computer owned and used by you and for back-up purposes), disclose, publish, export, distribute, rent, lease or sublicense.
- remove any BOOM trademarks or copyright notices from;
- modify, translate or prepare derivative works of;
- use in a computer-based services business or publicly display visual output of;
- transmit by audio, digital or other electronic means or post software on any file-sharing site or
- reverse engineer, decompile or disassemble all or any portion of the SOFTWARE in any form, except as expressly licensed herein.
Section 4 – Audio Rights (Rights to the works):
- This license grants the rights to produce new works using our SOFTWARE. Such new works can be created using the presets included in the SOFTWARE. This license includes the worldwide, royalty-free, non-exclusive right to combine or sync works created with our SOFTWARE into media projects without
- paying any additional license fees to BOOM or any third-party other than the purchasing cost of this license;
- obtaining additional clearances or permissions; or
- providing source attribution to BOOM.
- This license includes mechanical, synchronization, public performance and broadcast rights.
- This license grants the worldwide and limited right to Licensee to use, re-record, duplicate, incorporate, modify, adapt, embed, and exploit all or a portion of the works created with our SOFTWARE without further payment to BOOM or any third party (royalty free). The media projects that can use the works created under this license using our SOFTWARE need to contain an additional element: i.e. voice, music, image, etc. Examples of allowed uses are, without limitation, inclusion in radio programs, podcasts, mobile apps, television broadcasts, film soundtrack, music albums, PowerPoint presentations, sound effects libraries, software instruments, websites, advertising, multi media presentations, video games and other similar products.
Section 5 – Limitations:
- This license expressly forbids any unauthorized inclusion of the SOFTWARE or parts of the SOFTWARE code into applications or hardware products that you manufacture for your customers.
- This license also forbids any stand-alone re-distribution method of our SOFTWARE, through any means, including but not limited to, re-selling, trading, sharing, re-compiling, mixing, processing, isolating, or embedding into other software or hardware of any kind, for the purpose of re-recording or reproduction as part of any free or commercial library of musical and/or sound effect samples and/or articulations, or any form of musical sample or sound effect sample playback system or device.
- All licenses and rights under this license are nontransferable, which means Licensee may not sell, gift, or in any way allow another individual or business the rights obtained pursuant to this license except to Licensee’s affiliates and successors. If Licensee is acquired by another business or organized under another business name or tax entity, all licenses and rights under this Agreement may be transferred provided that number of users and workstations has not increased, and BOOM is notified of this transfer in writing within 30 days.
Section 6 – User Responsibility:
- Licensee is responsible for installation, management and operation of the SOFTWARE e. Further, Licensee agrees to indemnify, hold harmless and defend BOOM from and against all claims or lawsuits, including attorneys' fees, that arise or result from any use or distribution of the SOFTWARE not expressly authorized in this Agreement.
- Warranty. BOOM warrants the SOFTWARE media (e.g. download) to be free from defects in materials and workmanship for a period of sixty (60) days from the date of purchase. BOOM will replace any such defective media returned to BOOM during such warranty period, provided such defect is not the result of improper use or neglect, or if BOOM is unable to do so, it will refund your price for such defective SOFTWARE. Replacement (or refund) is the exclusive remedy for any such defects, and BOOM shall have no liability for any other damages.
- THE FOREGOING WARRANTY IS IN LIEU OF ALL OTHER EXPRESS OR IMPLIED WARRANTIES, INCLUDING ANY WARRANTIES OF MERCHANTABILITY OR FITNESS FOR A PARTICULAR PURPOSE. IN NO EVENT WILL BOOM BE LIABLE FOR ANY KIND OF SPECIAL, INCIDENTAL OR CONSEQUENTIAL DAMAGES, INCLUDING LOST PROFITS, EVEN IF BOOM HAS KNOWLEDGE OF SUCH POTENTIAL LOSS OR DAMAGE.
Section 7 – Termination and reservation of right:
- This Agreement is effective until terminated. You may terminate it at any time by destroying the SOFTWARE, including all computer programs and documentation, and erasing any copies residing on computer equipment. This Agreement also will terminate if you do not comply with any terms or conditions of this Agreement. Upon such termination you agree to destroy the SOFTWARE and erase all copies residing on computer equipment.
- This Agreement may be subject to alterations, due to changes in law, new distribution channels, acquisition of BOOM by a third-party entity, new rules applied by third party software providers on whom BOOM’s SOFTWARE rely on. BOOM warrants that any such alternation will happen in the best interest of the Licensee and BOOM and that BOOM will inform Licensee in due time and in written form of any such changes.
Section 8 – Agreement:
- This Agreement expresses the entire understanding between you and BOOM and supersedes all other oral or written communications relating to the SOFTWARE. This Agreement shall be governed and construed under the laws of the Federal Republic of Germany and subject to the exclusive jurisdiction of the courts therein.
- Some content included BOOM’s SOFTWARE, as well as any associated intellectual property rights and titles, belongs to third parties. This content may be protected by copyright or other intellectual property laws and treaties and may be subject to terms and conditions from the third party providing the content.
- If any section of this SULA should be or become invalid, either completely or in part, this shall not affect the validity of the remaining sections. The parties agree that they make good effort to replace the invalid section with a valid regulation which comes as close as possible to the purpose originally intended.
Multi User License Agreement
This license agreement is an end-user agreement for multi users / enterprise licenses. For single-user setups / personal licenses, please refer to the Single User License Agreement, or contact us via service@boomlibrary.com
The following Multi User License Agreement ("MULA") represents the contractual conditions between a company / enterprise ("CLIENT" or “YOU”) and BOOM Library ("BOOM", visit www.boomlibrary.com/about for the official legal company details and address) for the use of audio plug-ins or software including related media, documentation (e.g. manuals) and other documents and materials (e.g. presets) manufactured by BOOM ("SOFTWARE”). By installing and by registering the SOFTWARE on CLIENT’s work-station(s), CLIENT declares full agreement with these conditions. If CLIENT does not agree with these conditions, CLIENT is not allowed to install the SOFTWARE. Copyright laws and international copyright treaties, as well as other intellectual property laws and treaties protect the content. All rights not expressly granted to CLIENT hereunder are reserved by BOOM.
Section 1 – Introduction:
- What You Get:
- You get to install the SOFTWARE on up to three (3) workstations per licensed user, only to be used by the licensed user. Such workstations can be individual computers in an edit bay and a laptop for the field, or your computer at work (or school) and your computer at home, etc.
- Please note that a sequencer software is needed to run our SOFTWARE which is not included in this license.
- CLIENT can copy the SOFTWARE only once, for the sole purpose of making a backup copy.
- If you are an educator and need a license for your lab / institutional setup please contact us for educational pricing.
- You can export, render out, re-record or otherwise save any type of sound, noise, music, pad (“work”) created with our SOFTWARE and its presets and use it as part of any video, game, audio library or other media production (“MEDIA PROJECTS”), even other people’s MEDIA PROJECTS that you didn’t do, if the works are made from the copy of the SOFTWARE you have on your workstations and used as per our MULA.
- What You Don’t Get:
- You don’t get to make any other copies of the SOFTWARE.
- Please don’t share our SOFTWARE on the internet – we are a small company, and unlicensed copies hurt our ability to make our products better for you and bring you new products in the future.
Section 2 – Ownership:
- The enclosed SOFTWARE and related instructions are licensed (not sold) to you, and BOOM retains all ownership interests and intellectual property rights in the SOFTWARE.
Section 3 – Software License:
- BOOM grants you a nonexclusive, nontransferable license to (i) install and use one copy of the SOFTWARE on up to no more than three (3) workstations per licenses user, as part of the enterprise license / MULA between CLIENT and BOOM. CLIENT can make one copy of the SOFTWARE for back-up or archival purposes only.
- If CLIENT has licensed a bundled product, either from BOOM Library or a third-party, that rightfully includes a version of the SOFTWARE (e.g. “read-only” player, or OEM version – hereinafter: “PRODUCT BUNDLE”), CLIENT does not have to pay any additional license fee to BOOM Library in order to use the SOFTWARE with the license and version as included in this PRODUCT BUNDLE.
- The SOFTWARE cannot technically be installed on a network server, it runs on individual machines only. CLIENT may not:
- copy (other than for additional workstations as stated in this MULA), disclose, publish, export, distribute, rent, lease or sublicense.
- remove any BOOM trademarks or copyright notices from;
- modify, translate or prepare derivative works of;
- use in a computer-based services business or publicly display visual output of;
- transmit by audio, digital or other electronic means or post software on any file-sharing site or
- reverse engineer, decompile or disassemble all or any portion of the SOFTWARE in any form, except as expressly licensed herein.
Section 4 – Audio Rights (Rights to the works):
- This license grants the rights to produce new works using the SOFTWARE. Such new works can be created using the presets included in the SOFTWARE. This license includes the worldwide, royalty-free, non-exclusive right to combine or sync works created with the SOFTWARE into media projects without
- paying any additional license fees to BOOM or any third-party other than the purchasing cost of this license;
- obtaining additional clearances or permissions; or
- providing source attribution to BOOM.
- This license includes mechanical, synchronization, public performance and broadcast rights.
- This license grants the worldwide and limited right to CLIENT to use, re-record, duplicate, incorporate, modify, adapt, embed, and exploit all or a portion of the works created with our SOFTWARE without further payment to BOOM or any third party (royalty free). The media projects that can use the works created under this license using our SOFTWARE need to contain an additional element: i.e. voice, music, image, etc. Examples of allowed uses are, without limitation, inclusion in radio programs, podcasts, mobile apps, television broadcasts, film soundtrack, music albums, PowerPoint presentations, sound effects libraries, software instruments, websites, advertising, multi media presentations, video games and other similar products.
Section 5 – Limitations:
- This license expressly forbids any unauthorized inclusion of the SOFTWARE or parts of the SOFTWARE code into applications or hardware products that CLIENT manufacture for CLIENTS customers.
- This license also forbids any stand-alone re-distribution method of the SOFTWARE, through any means, including but not limited to, re-selling, trading, sharing, re-compiling, mixing, processing, isolating, or embedding into other software or hardware of any kind, for the purpose of re-recording or reproduction as part of any free or commercial library of musical and/or sound effect samples and/or articulations, or any form of musical sample or sound effect sample playback system or device.
- All licenses and rights under this license are nontransferable, which means CLIENT may not sell, gift, or in any way allow another individual or business the rights obtained pursuant to this license except to CLIENT’s affiliates and successors. If the CLIENT is acquired by another business or organized under another business name or tax entity, all licenses and rights under this MULA may be transferred provided that number of users and workstations has not increased, and BOOM is notified of this transfer in writing within 30 days.
Section 6 – User Responsibility:
- CLIENT is responsible for installation, management and operation of the SOFTWARE. Further, CLIENT agrees to indemnify, hold harmless and defend BOOM from and against all claims or lawsuits, including attorneys' fees, that arise or result from any use or distribution of the SOFTWARE not expressly authorized in this MULA.
- Warranty. BOOM warrants the SOFTWARE media (e.g. download) to be free from defects in materials and workmanship for a period of sixty (60) days from the date of purchase. BOOM will replace any such defective media returned to BOOM during such warranty period, provided such defect is not the result of improper use or neglect, or if BOOM is unable to do so, it will refund your price for such defective SOFTWARE. Replacement (or refund) is the exclusive remedy for any such defects, and BOOM shall have no liability for any other damages.
- THE FOREGOING WARRANTY IS IN LIEU OF ALL OTHER EXPRESS OR IMPLIED WARRANTIES, INCLUDING ANY WARRANTIES OF MERCHANTABILITY OR FITNESS FOR A PARTICULAR PURPOSE. IN NO EVENT WILL BOOM BE LIABLE FOR ANY KIND OF SPECIAL, INCIDENTAL OR CONSEQUENTIAL DAMAGES, INCLUDING LOST PROFITS, EVEN IF BOOM HAS KNOWLEDGE OF SUCH POTENTIAL LOSS OR DAMAGE.
Section 7 – Termination and reservation of right:
- This MULA is effective until terminated. You may terminate it at any time by destroying the SOFTWARE, including all computer programs and documentation, and erasing any copies residing on computer equipment. This MULA also will terminate if you do not comply with any terms or conditions of this MULA. Upon such termination you agree to destroy the SOFTWARE and erase all copies residing on computer equipment.
- This MULA may be subject to alterations, due to changes in law, new distribution channels, acquisition of BOOM by a third party entity, new rules applied by third party software providers on whom BOOM’s SOFTWARE rely on. BOOM warrants that any such alternation will happen in the best interest of the CLIENT and BOOM and that BOOM will inform CLIENT in due time and in written form of any such changes.
Section 8 – Agreement:
- This MULA expresses the entire understanding between CLIENT and BOOM and supersedes all other oral or written communications relating to the SOFTWARE. This MULA shall be governed and construed under the laws of the Federal Republic of Germany and subject to the exclusive jurisdiction of the courts therein.
- Some content included BOOM’s SOFTWARE, as well as any associated intellectual property rights and titles, belongs to third parties. This content may be protected by copyright or other intellectual property laws and treaties and may be subject to terms and conditions from the third party providing the content.
- If any section of this MULA should be or become invalid, either completely or in part, this shall not affect the validity of the remaining sections. The parties agree that they make good effort to replace the invalid section with a valid regulation which comes as close as possible to the purpose originally intended.
APPENDIX A: SOFTWARE LICENSE AGREEMENTS OF THIRD PARTIES
I - Inno Setup License:
Except where otherwise noted, all of the documentation and software included in the Inno Setup package is copyrighted by Jordan Russell. Copyright (C) 1997-2013 Jordan Russell. All rights reserved. Portions Copyright (C) 2000-2013 Martijn Laan. All rights reserved.
This software is provided "as-is," without any express or implied warranty. In no event shall the author be held liable for any damages arising from the use of this software.
Permission is granted to anyone to use this software for any purpose, including commercial applications, and to alter and redistribute it, provided that the following conditions are met:
- All redistributions of source code files must retain all copyright notices that are currently in place, and this list of conditions without modification.
- All redistributions in binary form must retain all occurrences of the above copyright notice and web site addresses that are currently in place (for example, in the About boxes).
- The origin of this software must not be misrepresented; you must not claim that you wrote the original software. If you use this software to distribute a product, an acknowledgment in the product documentation would be appreciated but is not required.
- Modified versions in source or binary form must be plainly marked as such, and must not be misrepresented as being the original software.
Jordan Russell, jr-2010 AT jrsoftware.org, http://www.jrsoftware.org/
II - PFFFT : a Pretty Fast FFT
Copyright (c) 2013 Julien Pommier (pommier@modartt.com )
Based on original fortran 77 code from FFTPACKv4 from NETLIB, authored by Dr Paul Swarztrauber of NCAR, in 1985. As confirmed by the NCAR fftpack software curators, the following FFTPACKv5 license applies to FFTPACKv4 sources. My changes are released under the same terms.
FFTPACK license:
http://www.cisl.ucar.edu/css/software/fftpack5/ftpk.html
Copyright (c) 2004 the University Corporation for Atmospheric Research ("UCAR"). All rights reserved. Developed by NCAR's Computational and Information Systems Laboratory, UCAR, www.cisl.ucar.edu.
Redistribution and use of the Software in source and binary forms, with or without modification, is permitted provided that the following conditions are met:
- Neither the names of NCAR's Computational and Information Systems Laboratory, the University Corporation for Atmospheric Research, nor the names of its sponsors or contributors may be used to endorse or promote products derived from this Software without specific prior written permission.
- Redistributions of source code must retain the above copyright notices, this list of conditions, and the disclaimer below.
- Redistributions in binary form must reproduce the above copyright notice, this list of conditions, and the disclaimer below in the documentation and/or other materials provided with the distribution.
THIS SOFTWARE IS PROVIDED "AS IS", WITHOUT WARRANTY OF ANY KIND, EXPRESS OR IMPLIED, INCLUDING, BUT NOT LIMITED TO THE WARRANTIES OF MERCHANTABILITY, FITNESS FOR A PARTICULAR PURPOSE AND NONINFRINGEMENT. IN NO EVENT SHALL THE CONTRIBUTORS OR COPYRIGHT HOLDERS BE LIABLE FOR ANY CLAIM, INDIRECT, INCIDENTAL, SPECIAL, EXEMPLARY, OR CONSEQUENTIAL DAMAGES OR OTHER LIABILITY, WHETHER IN AN ACTION OF CONTRACT, TORT OR OTHERWISE, ARISING FROM, OUT OF OR IN CONNECTION WITH THE SOFTWARE OR THE USE OR OTHER DEALINGS WITH THE SOFTWARE.
III - FFTConvolver
Copyright (c) 2017 HiFi-LoFi
Permission is hereby granted, free of charge, to any person obtaining a copy of this software and associated documentation files (the "Software"), to deal in the Software without restriction, including without limitation the rights to use, copy, modify, merge, publish, distribute, sublicense, and/or sell copies of the Software, and to permit persons to whom the Software is furnished to do so, subject to the following conditions:
The above copyright notice and this permission notice shall be included in all copies or substantial portions of the Software.
THE SOFTWARE IS PROVIDED "AS IS", WITHOUT WARRANTY OF ANY KIND, EXPRESS OR IMPLIED, INCLUDING BUT NOT LIMITED TO THE WARRANTIES OF MERCHANTABILITY, FITNESS FOR A PARTICULAR PURPOSE AND NONINFRINGEMENT. IN NO EVENT SHALL THE AUTHORS OR COPYRIGHT HOLDERS BE LIABLE FOR ANY CLAIM, DAMAGES OR OTHER LIABILITY, WHETHER IN AN ACTION OF CONTRACT, TORT OR OTHERWISE, ARISING FROM, OUT OF OR IN CONNECTION WITH THE SOFTWARE OR THE USE OR OTHER DEALINGS IN THE SOFTWARE.
IV - Roboto Fonts
This application makes use of the Roboto fonts authored by Christian Robertson and made available through Google Fonts (fonts.google.com) under the terms of the Apache Software License v2. Version 2.0, January 2004, http://www.apache.org/licenses/
- Grant of Copyright License: Subject to the terms and conditions of this License, Apache hereby grants to You a perpetual, worldwide, non-exclusive, no-charge, royalty-free, irrevocable copyright license to reproduce, prepare Derivative Works of, publicly display, publicly perform, sublicense, and distribute the Work and such Derivative Works in Source or Object form.
- Trademarks: This License does not grant permission to use the trade names, trademarks, service marks, or product names of the Licensor, except as required for reasonable and customary use in describing the origin of the Work and reproducing the content of the NOTICE file.
- Disclaimer of Warranty: Unless required by applicable law or agreed to in writing, Licensor provides the Work (and each Contributor provides its Contributions) on an "AS IS" BASIS, WITHOUT WARRANTIES OR CONDITIONS OF ANY KIND, either express or implied, including, without limitation, any warranties or conditions of TITLE, NON-INFRINGEMENT, MERCHANTABILITY, or FITNESS FOR A PARTICULAR PURPOSE. You are solely responsible for determining the appropriateness of using or redistributing the Work and assume any risks associated with Your exercise of permissions under this License.
- Limitation of Liability: In no event and under no legal theory, whether in tort (including negligence) contract, or otherwise, unless required by applicable law (such as deliberate and grossly negligent acts) or agreed to in writing, shall any Contributor be liable to You for damages, including any direct, indirect, special, incidental, or consequential damages of any character arising as a result of this License or out of the use or inability to use the Work (including but not limited to damages for loss of goodwill, work stoppage, computer failure or malfunction, or any and all other commercial damages or losses), even if such Contributor has been advised of the possibility of such damages.
V - Steinberg VST License
VST® is a trademark by Steinberg Media Technologies GmbH, registered in Europe and other countries.
LIMITATION OF LIABILITY
- Subject to the provisions in the following sub-sections, Steinberg shall only be liable, irrespective of the legal grounds, for damages caused by the intentional or grossly negligent conduct of Steinberg, its legal representatives, managerial employees or any other vicarious agents. In the case of damage caused by the grossly negligent conduct of any other vicarious agents, the liability shall be limited to those damages which must typically be expected within the scope of an agreement such as the present one. Any further liability other than as permitted under this agreement shall be excluded.
- Any liability of Steinberg for damages arising from violation of life, body and health, from the assumption of a guarantee or from a procurement risk as well as Steinberg's liability for damages pursuant to the Product Liability Act (Produkthaftungsgesetz) shall remain unaffected.
- To the extent the liability of Steinberg is excluded pursuant to the subsections of these provisions, this shall also apply to the benefit of Steinberg's employees in the event the Licensee files any claims directly against them.
PRODUCT WARRANTY
- Steinberg licences the VST PlugIn Interface Technology on an "AS IS" basis. Steinberg makes no warranties, express or implied, including without limitation the implied warranties of merchantability and fitness for a particular purpose, regarding the VST PlugIn Interface Technology or operation and use in combination with the Licensee’s program. Neither the Licensee, its employees, agents or Distributors have any right to make any other representation, warranty or promise with respect to the VST PlugIn Interface Technology.
- In no event shall Steinberg be liable for incidental, indirect or consequential damages arising from the use, or distribution of the VST PlugIn Interface Technology by the Licensee, whether theory of contract, product liability or otherwise. All claims for indemnification for losses by the Licensee itself or by third parties shall be excluded.
- Steinberg may in its sole discretion discontinue the distribution of the current VST PlugIn SDK and/or release improved versions of the Licensed Software Developer Kit but offers no commitment whatsoever those releases will occur at any time or for anybody.
INFRINGEMENT
- Steinberg represents and warrants that, as of the date of this Agreement, it is not aware of any claim or action alleging that VST, the VST PlugIn Interface Technology, or the content of the Licensed Software Developer Kit infringes any third party intellectual property right.
- Steinberg, however, disclaims any obligation of defense or indemnify of the Licensee or its customer with respect to any such claim or action, or otherwise arising out of this agreement. Steinberg shall have no liability arising out of any such actual or alleged intellectual property infringement. The Licensee, however, shall promptly notify Steinberg, in writing, of each such infringement claim of which the Licensee becomes aware. Steinberg may defend the Licensee against such claims. In such case, the Licensee is obligated to duly support Steinberg’s defense.
This is a software of BOOM Library.
All other product names, brands and trademarks, mention of which in this document and the software is for identification purposes only and does not imply affiliation or endorsement, are the property of their respective owners.
BOOM Library
Visit www.boomlibrary.com/about for the official legal company details and address.
© BOOM Library, . All Rights Reserved.